 Months ago I said I would post an outline stitch embroidery tutorial...well, finally here it is. I can't believe how long it took me to get someone to take the photos-fortunately DS was up for New Year's week-end and he took the photos...but it was at night so please excuse the orangy color!
I'm starting with separating the floss strands and threading the needle so if you're good with that just skip on down.
I use six strand DMC floss (here its #310 black) and usually use two strands. Cut off an arms length of the floss and spread the floss out between your fingers.
 Now - keeping the floss pressed between your fingers - pull on only one strand. Pull it out completely in one draw.
 Since I'm using two strands I just pull out a second one the same way. Don't try to pull two at a time-they will only knot up and make a mess.
 I next align the two strands together and hold them in my left hand (my non-dominant hand) pinched between my fingers. I hold the needle in my right hand and with the eye of needle visible to my eye- I just aim at the floss.

This works all the time...by pinching the floss or thread between my fingers the floss (or thread) can't wiggle away from the needle the way it can when you take the thread to the needle. This works as well for six strands of floss as two and for any size needle-including little size 10 or 12 quilting needles.
Now that my needle is threaded, I tie a knot at the end of the thread (yes, I use a knot!). And bring the needle up from the back of the marked fabric on the line I want to start on.
 Pull the needle through...holding the thread up above the line, put the needle back in on the line.
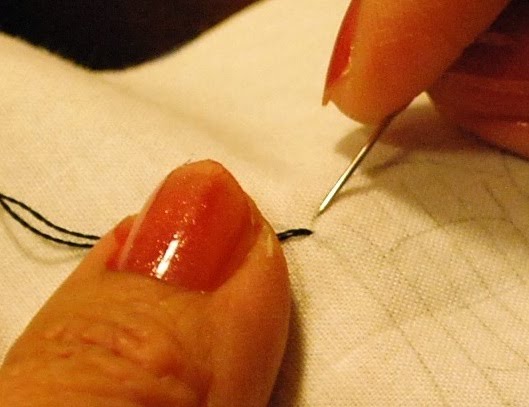 Bring the needle out on the line back towards the floss exiting the fabric...
 Take small stitches...always with the thread held above the line and the needle always going in and coming out on the line. Instruction books always say to have the needle come out about half way back towards the thread but I usually work with smaller stitches and the needle comes out almost at the thread...really just a tiny bit in front.
That's the first stitch...
 and the second....
 and the third! You just keep going...its that simple!
 The outline stitch is faster to sew than back stitch...it also gives a more raised appearance than back stitch.
 and the second....
 and the third! You just keep going...its that simple!
 The outline stitch is faster to sew than back stitch...it also gives a more raised appearance than back stitch.
Hope this has been helpful! I really love this style of embroidery and as you know, use it a lot.


16 comments:
Thanks for this, Miri. It's been a while since I've embroidered, but this makes me want to do it again. Do you use a hoop? What kind of fabric are you embroidering on? Does floss shrink or tighten up when you wash the quilt? (sorry for all the questions)
Good questions!
I don't use a hoop...I just find it easier not to. I suggest trying it both ways and see what works best for you.
I do all my embroidery for quilts or pillows so I use regular quilting weight fabrics...often bleached muslin.
I've never found that embroidery shrank or pulled the fabric when washed-not on my quilts or my vintage pieces either. I made an all embroidered duvet cover (comforter cover) that's been washed a lot and the embroidery looks the same to me.
Great job. Photos are great too. I like the close ups.
Great Tutorial...thanks~~~
Thanks for the tutorial Miri...very interesting indeed.
Micki
I think this is one of my most fav stitches, or at least the one that I use the most often.
thanks for the tutorial. I do a little stitching but not a lot - I think I will change that this year and make a patchwork with white blocks scattered throughout with embroidery on them.
Karen
http://karensquilting.com/blog/
Thank you, Miri. Very good tutorial.
Wonderful Blog Miri! I've been trying to follow you for ages but I was still figuring out about this blog thing. But I kept on fiddling and now smooth sailing. Yay!
I love that you are so detailed with your descriptions and every step of the action you have photos.
I would love to make this project and share this blog with my friends at facebook and twitter.
Thank you
Aubrey
aubreymade.etsy.com
I can't believe how long it took me to get someone to take the photos-fortunately DS was up for New Year's week-end and he took the photos...but it was at night so please excuse the orangy color! cheap sewing machines
I next align the two strands together and hold them in my left hand (my non-dominant hand) pinched between my fingers Best Reverse Osmosis System
I had an industrial sewing machine and I have been looking at the various options out there weight bench reviews.
is an informative post and it is very useful and knowledgeable. therefore, I would like to thank you for the efforts you have made in writing this article best electric can opener reviews
Post a Comment