
Last week when I posted my newest punch needle quilt block, several people commented that they were interested in punch needle and a punch needle quilt but had never done it. I thought I would post a punch needle tutorial to help people get started.
Here's what you need to get started: A punch needle, a threader, pearl cotton # 5, muslin (or white bleached muslin), a pattern to draw or trace onto the wrong side of the fabric and an embroidery hoop-size 6".
 Punch needle can be done with many different kinds of threads or yarns...since these are punch needle quilt blocks, I'm using Pearl Cotton. There are many different types of punch needle needles-some of them have a dial that can change the size of the loop that the needle makes. I prefer using a needle that doesn't have a dial and therefore always makes the same size loop. If you are using a needle with a dial-try out different settings until you find the one best for your project. For quilt blocks, I recommend a short loop.
Any simple applique pattern-with fairly large shapes-works wonderfully for punch needle. My patterns are from the book: The Wickersham Signature Quilt from The State Museum of Pennsylvania, by Patricia Harants. The Wickersham Quilt was made in the mid-1850s in York County, Pennsylvania.
Here's the block I'm working on now. You can see the marked pattern, partially worked. Embroidery hoops come in two parts. Put the whole ring under the block. Open the screw (but don't let it come loose) and slip the top of the hoop over the block/bottom of the hoop.
 Tighten the screw. You want the fabric as tight as possible in the hoop (like a drum) so if you need to, pull gently on the fabric around the hoop.
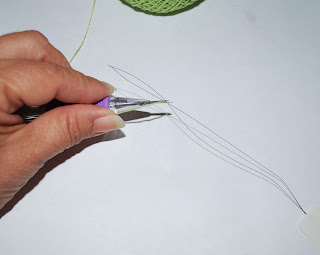
 Now thread your needle. Put the needle threader along the groove all the way through the needle. (Click on the pictures to enlarge.)
 Now put your thread through the end loop of the threader...
 and pull the threader completely out of the needle (with the thread! :)
 Gently pull the thread out of the threader.
 Hold the thread as shown and...
 put the threader through the hole in the needle.
 Put the thread through the end loop of the threader and pull the threader (and thread) back out the hole.
 Here's the threaded needle. Leave only a small tail of thread.
 Now you're ready to punch. Your needle should be held so that you do not see the groove in the needle-only the hole. (You can also punch with the needle facing side ways.) You will be punching towards your body.
 Push the needle all the way in.
 Lift the needle out just enough to clear the fabric and in it goes again for your next stitch. (Don't worry about the tail-we'll leave that for now.)
 Keep punching-remember to have the needle go all the way in on each stitch.
 Go along the outside, drawn line of your design.
 The next row goes right up next to the first row...you'll slowly fill in the design. Remember to keep the thread loose coming off the spool.
 The rows should be close together but don't worry if there's some fabric between rows. Look on the other side-the front side-at the loops and you'll see that its filling in nicely.
 Oops! What if I take a break and when I come back some stitches have come out? Or, what if my thread was pulled too tightly off the spool and the stitches came out?
 Tighten the screw. You want the fabric as tight as possible in the hoop (like a drum) so if you need to, pull gently on the fabric around the hoop.
 Now thread your needle. Put the needle threader along the groove all the way through the needle. (Click on the pictures to enlarge.)
 Now put your thread through the end loop of the threader...
 and pull the threader completely out of the needle (with the thread! :)
 Gently pull the thread out of the threader.
 Hold the thread as shown and...
 put the threader through the hole in the needle.
 Put the thread through the end loop of the threader and pull the threader (and thread) back out the hole.
 Here's the threaded needle. Leave only a small tail of thread.
 Now you're ready to punch. Your needle should be held so that you do not see the groove in the needle-only the hole. (You can also punch with the needle facing side ways.) You will be punching towards your body.
 Push the needle all the way in.
 Lift the needle out just enough to clear the fabric and in it goes again for your next stitch. (Don't worry about the tail-we'll leave that for now.)
 Keep punching-remember to have the needle go all the way in on each stitch.
 Go along the outside, drawn line of your design.
 The next row goes right up next to the first row...you'll slowly fill in the design. Remember to keep the thread loose coming off the spool.
 The rows should be close together but don't worry if there's some fabric between rows. Look on the other side-the front side-at the loops and you'll see that its filling in nicely.
 Oops! What if I take a break and when I come back some stitches have come out? Or, what if my thread was pulled too tightly off the spool and the stitches came out?
 Don't worry! Here you see how a stitch has come out. Now, how do I get the thread back to being short-just a stitch from my fabric?
 Just gently pull of the end of the thread...remember gently! just until the needle touches the fabric. Now punch some more.
 Finished! How do I end? Hold your thumb on the needle and thread and gently pull the needle away from your work.
 Now snip the thread very close. (You can snip the beginning tail now too.)
 There, a leaf all punched and threads neatly trimmed.
 Here's how it looks on the right side. (I don't see any funky long loops on this leaf but don't worry if you have some. I'll post a part 2 tutorial on how to finish up your punch needle that will cover that and more.)
 Once you've finished part of your block and you have to move your hoop, you will have to have some of the punched area under the hoop. Its fine, it won't be permanently squooshed or anything but it will mean that the fabric won't be quite as tight in the hoop and you may have to gently pull on the fabric around the hoop now and then.
 Hope that's helpful for getting started on your Punch Needle Quilt or any punch needle project.


5 comments:
Great tutorial. I love punchneedle. I consider my self a beginner so I enjoy the tips.
Oh that looks really great! Must give it a try once! Thanks for sharing the tutorial! Thanks for visiting me also! (by the way, my favorite flea market is the one in downtown Haifa on Saturday mornings).
Thanks for the tutorial!! That looks like something I would like to try! Thank you also for the book reviews. I had no idea that i could download free books.
Great tutorial! I bought one and I'm going to practice it. Thanks!!!
Does the hoop squish the loops? I mean when you have to move the hoop and it covers some of the work you have done.
Post a Comment