I'm linking to Design Wall Monday at Patchwork Times(I know, I'm so poky!), Finished for Friday at Lit and Laundry and Sew and Tell at AmyLouWho (now I'm an early bird so the links will go up tomorrow!:). Stop by and see all the wonderful projects everyone has going!
Showing posts with label punchneedle. Show all posts
Thursday, July 7, 2011
Punch Needle Quilt: Block 6 finished
I finished another punch needle quilt block...don't you think I work fast? LOL! This block was partially completed last summer-I had done the flower but I had run out of the green pearl cotton so it languished all winter!
There are now 6 completed blocks and I'm really liking how they all look together on my design wall. This looks like a lot of red but it really isn't. Two of the blocks have the variegated thread, one a hot pink and only the one is truly red.
I've posted a punch needle tutorial here if you'd like to try this. Its fun, its fast and it's an easy take-along-to-the-pool summer project.Best of all, it looks like nothing else with its unique texture!
Monday, July 4, 2011
Punch Needle Tutorial
Last week when I posted my newest punch needle quilt block, several people commented that they were interested in punch needle and a punch needle quilt but had never done it. I thought I would post a punch needle tutorial to help people get started.
Here's what you need to get started: A punch needle, a threader, pearl cotton # 5, muslin (or white bleached muslin), a pattern to draw or trace onto the wrong side of the fabric and an embroidery hoop-size 6".
Any simple applique pattern-with fairly large shapes-works wonderfully for punch needle. My patterns are from the book: The Wickersham Signature Quilt from The State Museum of Pennsylvania, by Patricia Harants. The Wickersham Quilt was made in the mid-1850s in York County, Pennsylvania.
Here's the block I'm working on now. You can see the marked pattern, partially worked. Embroidery hoops come in two parts. Put the whole ring under the block. Open the screw (but don't let it come loose) and slip the top of the hoop over the block/bottom of the hoop.
Tighten the screw. You want the fabric as tight as possible in the hoop (like a drum) so if you need to, pull gently on the fabric around the hoop.
Now thread your needle. Put the needle threader along the groove all the way through the needle. (Click on the pictures to enlarge.)
Now put your thread through the end loop of the threader...
and pull the threader completely out of the needle (with the thread! :)
Gently pull the thread out of the threader.
Hold the thread as shown and...
put the threader through the hole in the needle.
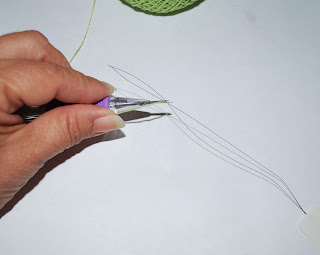
Put the thread through the end loop of the threader and pull the threader (and thread) back out the hole.
Here's the threaded needle. Leave only a small tail of thread.
Now you're ready to punch. Your needle should be held so that you do not see the groove in the needle-only the hole. (You can also punch with the needle facing side ways.) You will be punching towards your body.
Push the needle all the way in.
Lift the needle out just enough to clear the fabric and in it goes again for your next stitch. (Don't worry about the tail-we'll leave that for now.)
Keep punching-remember to have the needle go all the way in on each stitch.
Go along the outside, drawn line of your design.
The next row goes right up next to the first row...you'll slowly fill in the design. Remember to keep the thread loose coming off the spool.
The rows should be close together but don't worry if there's some fabric between rows. Look on the other side-the front side-at the loops and you'll see that its filling in nicely.
Oops! What if I take a break and when I come back some stitches have come out? Or, what if my thread was pulled too tightly off the spool and the stitches came out?
Don't worry! Here you see how a stitch has come out. Now, how do I get the thread back to being short-just a stitch from my fabric?
Just gently pull of the end of the thread...remember gently! just until the needle touches the fabric. Now punch some more.
Finished! How do I end? Hold your thumb on the needle and thread and gently pull the needle away from your work.
Now snip the thread very close. (You can snip the beginning tail now too.)
There, a leaf all punched and threads neatly trimmed.
Here's how it looks on the right side. (I don't see any funky long loops on this leaf but don't worry if you have some. I'll post a part 2 tutorial on how to finish up your punch needle that will cover that and more.)
Once you've finished part of your block and you have to move your hoop, you will have to have some of the punched area under the hoop. Its fine, it won't be permanently squooshed or anything but it will mean that the fabric won't be quite as tight in the hoop and you may have to gently pull on the fabric around the hoop now and then.
Hope that's helpful for getting started on your Punch Needle Quilt or any punch needle project.
Saturday, August 21, 2010
Punch needle project and an award
I've started a project that I've been thinking about for a while...remember my punch needle pillow? Well, I've decided to do a punch needle quilt! I think with straight line machine quilting this will be quite interesting.
This is the first block finished...well, not quite finished-its untrimmed and unblocked! What do you think of the variegated pearl cotton...I'm not sure myself but DH really likes it.
Here's the second block I'm working on...these don't really take very long and are fun to do. I'm using crochet cotton and/or pearl cotton. This is the back...you can just see the pencil drawn pattern.
Here's the front.
I'm taking the patterns from this book...its the pattern book for a York County, Pennsylvania applique quilt that is believed to have been made in 1854.
I was given an award!

I'm so fortunate to have met so many lovely bloggers and two of them have given me the Versatile Bloggers award: LV from Thoughts from Meme's Corner ,an eighty year old wonder blogger and P from The Way I Sew It, a wonderful quilter! Do visit their blogs.

I'm so fortunate to have met so many lovely bloggers and two of them have given me the Versatile Bloggers award: LV from Thoughts from Meme's Corner ,an eighty year old wonder blogger and P from The Way I Sew It, a wonderful quilter! Do visit their blogs.
Here are the rules of the award: say thank you and link back...thank you ladies!, tell 7 things about myself and I'm to pass it on to 15 bloggers. I've decided to use this opportunity to introduce you to bloggers I've never linked to before.
First though 7 things about myself...hmm, well at least it doesn't say 7 interesting things.
1. My newest have-to-watch re-runs (we get a lot of old shows here!) are Stargate Atlantis.
2. I love the Dixie Chicks.
3. I can't sing for beans but that doesn't stop me from Karaoke.
4. What I love about quilting is there's always something new to try and something new to learn.
5. I can't knit and I've given up trying.
6. I'm a great procrastinator so I give myself due dates...and join challenges.
7. I'm only competitive when it comes to board games.
And now for the blog list: enjoy visiting!
1. For a hilarious look at baking, visit Cake Wrecks.
2. Visit an on-line embroidery community at the Embroidery Blog.
3. For a look at mid-century houses, furnishings, etc. visit No Pattern Required.
4. If VTT once a week isn't enough for you, visit Oodles and oodles.
6. Taryn at Repro Quilt Lover
7.Kris at Summer at Grandma's House
8.Lisa at A Thread from the Edge
9.BJ at Ice Cream Mountain Quilts
10.Wenche at Pieces of Time
11.Nicole at Who does these things?
12.Jaimie at Baby Boomer Quilting Bee
14.Andi at Patch Andi
15. Two Hippos
Friday, May 14, 2010
Two Pillows Finished!
I finally finished up these two pillows. This first one, a string quilt project for the String Quilt Challenge at Loft Creations, was delayed by my never finding the time to finish up the embroidery but at last its done-before Spring is over!
This punchneedle (the design is from a vintage Pennsylvania quilt) has been waiting even longer to be finished...about a year! I like the cute little plaid ruffle. This looks great on a dark wood chair and also on the new slipcovers on our sofa.
I'm linking today to Finished for Friday at Lit and Laundry and to Sew and Tell at Amy Lou Who. Stop on by both and see the wonderful projects finished this week!
Monday, February 1, 2010
Pillows: Punchneedle and Crazy
Its been a crazy time around here...I just simply couldn't seem to get anything going sewing-wise. I finished the 42 string pieced blocks for DS's quilt but discovered that I had only a 1/4 yard of black fabric for the sashing-clearly not enough and then the local quilt shop was out of black fabric!!! I ordered some on-line but that will take a while to get here. I thought I'd piece the back of the quilt...but that didn't work out-I always seemed to be 17" short no matter what fabric I pulled from the closet (I even thought of a square and rectangle pieced back but when I pulled fabric I liked together...I was 17" short (not 16" or 18"-kind of spooky! ) I finally decided for forget working on his quilt for now and turned by attentions to some small projects that have been waiting in the wings: two pillows.
Remember this punchneedle I did last spring? Well, here it is as a pillow with, I think, a cute little plaid ruffle. Don't think the anti sewing gremlins had gone away...I first made this pillow too large and had to redo!
I had this foam pillow insert that I wanted to use so the pillow had to be the right size...I don't know what I did but after I took off the older cover (you can see how badly this needed to be replaced-I'm actually embarrassed to show this but you know, it suddenly completely deteriorated-last time I washed it, it was fine...ok from the looks of it that must have been awhile ago!)
I had promised to send a crazy quilt pillow to our friend Gabby in Germany. She took me to meet her seamtress and she insisted that I take some fancy fabric scraps...I've made 4 8" blocks and now really just have more embroidery to add.
Remember this punchneedle I did last spring? Well, here it is as a pillow with, I think, a cute little plaid ruffle. Don't think the anti sewing gremlins had gone away...I first made this pillow too large and had to redo!
I had this foam pillow insert that I wanted to use so the pillow had to be the right size...I don't know what I did but after I took off the older cover (you can see how badly this needed to be replaced-I'm actually embarrassed to show this but you know, it suddenly completely deteriorated-last time I washed it, it was fine...ok from the looks of it that must have been awhile ago!)
I had promised to send a crazy quilt pillow to our friend Gabby in Germany. She took me to meet her seamtress and she insisted that I take some fancy fabric scraps...I've made 4 8" blocks and now really just have more embroidery to add.A couple of years ago, I taught several crazy quilt classes and had the bottom two blocks (in class demo blocks) left over, so I only had two blocks to make. Most of the on-the-seam embroidery I did by machine except for the bottom right block where it is mostly by hand. On some of the on-the-seam machine embroidery, I added, by hand, french knots-it really makes it looks nice and doesn't take very long.
Now I'll mark some more designs on the larger fabrics (like the little teapot) and embroider them with DMC floss and I'll also add some silk ribbon bouquets...I saw a nice pattern with flowers trailing along a fence I think I want to do.
Now I'll mark some more designs on the larger fabrics (like the little teapot) and embroider them with DMC floss and I'll also add some silk ribbon bouquets...I saw a nice pattern with flowers trailing along a fence I think I want to do. To view some wonderful close-ups of antique crazy quilts-stop by Julie Silber's blog and you may get a party idea too!
Sunday, April 26, 2009
This and that applique and embroidery

I finished the February and March blocks for the A Tisket A Tasket BOM. I'm having alot of fun doing these but for now, applique is on hold. Allergy season has struck and even with medication, my eyes tear so much that I can't applique, I sneeze so vigorously and unexpectedly that I'm afraid to rotary cut and sewing on the machine, between the tears and the sneezes just isn't a good idea. But don't feel too sorry for me, there is always embroidery!
Here are two of the vintage embroidery patterns I showed last week...the girl and the boy will become pot holders soon. I also decided to try my hand at punchneedle embroidery.
I had no idea what I was doing but I was having alot of fun and I love the way this has turned out. It will be made into a pillow. The design is from an antique quilt, the Wickersham Signature Quilt. I got the book of patterns while visiting York, PA two years ago. There are lots of these funky basket blocks with the baskets way too small for the flowers. I love them! I just picked up the needlepunch and pearl cotton and started away on the design I'd traced on the muslin. As I went along, I thought that I really didn't know what I was doing... why were there those big loops popping up and did I really need to knot? I found this great tutorial at Ribbons and Lace Cottage and after that things went even quicker and more smoothly.
I'm thinking of doing another...I love chenille and this is kind of similiar!
Labels:
BOM,
hand applique,
punchneedle,
vintage embroidery transfers
Subscribe to:
Posts (Atom)