Saturday, September 27, 2008

Wedding Quilt: A vintage quilt reproduction

Here is the wedding quilt for my son Eli and his bride Tali. It is a reproduction of a vintage quilt, the Poppy by Marie Webster.

I love Marie Webster’s designs and have wanted to make one for a while so I was thrilled when I showed Eli and Tali a picture of Marie Webster’s Poppy and they were as excited as I was.


The quilt is hand appliquéd and hand quilted. The quilting is mainly 1” diagonal lines and around the appliqués, I also added the big, plump feathers that I like in the borders


and a love-bird design in the corners of the


medallion center.


The quilt is about 84” x 96”. I used Mountain Mist Blue Ribbon batting and I was very disappointed that Mountain Mist changed this venerable old batting (and a long time favorite of mine for fine hand quilting). Why do companies do that? If something has been around for 75-100 years, happily used by tons of people; why “improve” it. I have yet to find an “improved” product that was actually improved rather than the reverse.

I’m both happy and a little sad that this quilt is finished. I have worked on it for so long, I almost feel at a loss. Then again, my sewing machine is calling to me after all this hand work.


I just joined the New Year's Challenge hosted by Finn. My plan is to machine quilt five quilts tops by year's end. Believe me, finding 5 tops to quilt in my closet will not be the problem! :)

Wednesday, September 24, 2008

Vintage Thursday Thingie: Jewel Tea Company Cook Booklet

Vintage Thursday Thingies: Jewel Tea Company Cook Booklet

Since Lynn shared her vintage goodie from the Jewel Tea Company last week, I thought I’d show my Cook Booklet from the same company this week.

The Jewel Tea Company began home delivery of groceries in about 1901, and continued home delivery of groceries until 1981. Actually, home delivery is I think the wrong expression, I think you could choose your groceries right then and there. They became well known for their premiums (like Green Stamps or today, frequent flier miles).

Here’s their Homemakers Institute Kitchen.
I like the way all the recipes say things like: ¼ teaspoon Jewel Pepper or Jewel peanut butter or Jewel Vanilla Extract.
Mary Dunbar was a combination of spokesperson and dietician and like so many others in the 1930s, Mary Dunbar was not her real name. It was Leone Rutledge Carroll. I don’t why this fake name thing was so popular in the 1930s but it was (in food there was Ann Page (A&P) and of course, Betty Crocker and in quilting Aunt Martha and Grandma Dexter and many more too.)

The back of the booklet has lots of interesting information on everything from removing stains, to Beauty Culture: “Cleanliness is the first secret of beauty.”! to Table Setting and Rules for Serving. All featuring Jewel Tea Company products of course.

I wish the Jewel Tea Company car could come to my house.

For more Vintage Thursdays treasures, click on the button


Monday, September 22, 2008

Scrap Quilt

I am so excited. I took the Wedding Quilt off the frame this week-end! I'm already sewing the binding and then its just washing the quilt. I have worked on this for five months: 3 months on the hand applique and 2 months quilting it. I took a break for a few weeks around the wedding but otherwise I have been working on it steadily. It is very beautiful. I may dislocate my shoulder from patting myself on the back. I'll post pictures this week-end.

Now I can get back in my sewing room :) Well, I have been sneaking off to my sewing machine to work on the scrap quilt I mentioned. 
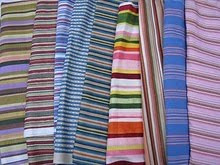
It is made of 9-patch and Roman Road blocks, set on point. I love both 9-patch and 4-patch set on point and use them alot. The border was sewn with the blocks into rows-what look like setting triangles around the 9-patch are really half-square triangle squares -half light/half dark blue. This made it a really fast quilt top to sew together. I'm offering it as a class this fall, hope people sign up, I would like to teach this quilt and since I always sew with the class, I'll get a second one. Maybe I'll make it pink!

Wednesday, September 17, 2008

Vintage Thursday Thingie: Thread Caddy


Today I'm truly showing a vintage thingamabob. Its a rotating thread holder and pin cushion with holes for thimbles. The base is cast iron and stamped "The Louise Economy" on the underside. The outside is chrome plated.

The thimble is not vintage (circa 1992) but the threads are and they are Clarks and Star, two longtime companies still in business. The front spool with the blue thread is a Clarks Boilfast I love that name-you could confindently wash anything sewn with that thread.

I've added my Mom's needle book from the l950's
and I thought it fun to show the inside. You can see you used almost all the needles except for one corner which is actually torn off the packet. (It probably got lost in the fondly remembered jumble of Mom's nightstand drawer) The other two needle packs were my Grandfather's. He was a tailor and don't those needle packs look more serious. They're both English needles but I haven't heard of them (Schul-sons, since 1751 and Leo Lammertz, London 1862).


While I would really like to this thingamabob for holding thread when I'm doing hand applique, I've put it on the shelf. Its been well used; the nap is off the velvet (like the bloom off her face), the fabric is splitting (crow's feet showing) and its tilted and a little wobbly. (Sigh) One can sympathize.

For more Vintage Thursdays treasures, click on the button


Sunday, September 14, 2008

Redwork Doll quilt top

A couple of weeks ago, Susan at Homespun Quilts wrote about looking at new sewing machines and I realized that I haven't really explored my "new" sewing machine (now 5 years old.) I decided to finally figure out how to use one of the embroidery programs and this is the result: a 14" x 18" Redwork doll quilt top. Now I want to figure out how to combine the various parts (I think a flower head is supposed to be on top of the 2nd row right square.

I'm really hoping to finish the Wedding Quilt this week (I just have to stop having fun and work,work,work.)

Wednesday, September 10, 2008

Vintage Log Cabin Quilt Blocks

I bought the 16 vintage log cabin blocks in this top at a quilt show in Oakland, CA a few years ago that I was lucky to catch while visiting my sister in Petaluma. Their bright colorfullness caught my eye and heart. I set them with the blue sashing and border using a reproduction fabric that I always think of as Dodger blue. I think the blocks date from the 1940's.


Whenever I see a vintage top or blocks that I like, I always wonder why wasn't the project finished. Was it lack of time, loss of interest or some problem that cropped up? (Ok, those are the usual reasons for my UFOs).


These blocks certainly had some problems: some were a little bit too big and some a little bit too small. That's one of the reasons I chose to use the sashing, an unusual choice for a log cabin but I have seen pictures of 1930s-40s log cabins with sashing and the sashing helped with the size problems.


I had to add a "fourth log" to one side of two too small blocks. For one I was able to trim a piece

of fabric from one too big block and use that -the red polka dot fabric on the left side is the added piece .


For the other, I had to go to my "stash" of vintage fabrics (which would fit in a sandwich bag) and I found a suitable piece! -the bottom blue and yellow print.


One of the nice things about having a vintage top or blocks is that you can turn them over and see how they were made. These were foundation pieced and were hand sewn to the foundation. I wish my camera was better (I'm getting a new one in December!) . I love the little piece of fabric caught in the seam.


I hope the unknown maker is pleased with what I have done with her blocks. I do plan to quilt this top; I'm thinking of quilting only in the sashing and border leaving the vintage blocks as they are.


For more Vintage Thursdays goodies, click here:


Saturday, September 6, 2008

Scrap quilts


I've decided to start a scrap quilt even though I'm still quilting the wedding quilt on the frame and I'm hoping to finish this week. One of the quilts I quilted this year was a scrap Stacked


Bricks quilt. I made the top (the


pattern is from Scrap Bonanza by Linda Halpin) several years ago.


I hand quilted it because I've been waiting for the right quilt for this border pattern for a long time and wanted to savor quilting it. I thought about quilting the parallel lines on the stacked bricks by machine but then I would have had to baste the quilt. The quilting patttern is from Pepper Cory's Quilting Patterns from Antique Quilts. I think its out of print but if you can get a copy, do.


Here's a close up of some the wacky flowers in this quilt pattern and the next pix will show the chicken (maybe its a rooster). I centered the rooster on all four borders and the flowers/vine flowed around him/her/it.

Thursday, September 4, 2008

Vintage Thursdays Quilt


This is my first Vintage Thursdays post and it is a Tumbling Blocks quilt.


Stylistically this quilt looks like a 1930’s quilt with overall fan quilting and the way the tumbling blocks were sewn together makes me think it was a Mountain Mist pattern.


But it has a polyester batt which makes it no earlier than the 1960s. I have made up a story in my head that this quilt was made by a long-time quilter who had her favorite patterns, this being one of them, that she just kept making. One day, her daughter or perhaps the saleswoman at the shop where she bought batting said to her “Why don’t you try this new polyester batting?” And she did.

Unfortunately the polyester batting has not been kind to her quilt. At both ends of the quilt, the quilting stitches have been rubbed out by the polyester batting and once the quilting was gone, the batt began to rub thin the backing fabric.


When I got this quilt, the bottom was open with the batting sticking out. I decided that I had to do something to save this quilt. I noticed that the binding was pulled to the back of the quilt for a knife-edge finish. I decided to add a new binding to both ends of the quilt (not just the open end) but make the binding so wide that it would cover and protect the worn thin backing fabric.
You can see in this picture the wide piece I added and the original binding (it also shows the fan quilting very nicely.


I really like this quilt and have learnt alot from it. I have not used a polyester batt since I got this quilt (there is one still in the closet) and I now know an easy way to sew a knife-edge finish when I don’t want the binding to show. It also sparked my interest in 6-pointed star quilts.

To see more Vintage Thursdays treasures, click onhttp://anapronaday.blogspot.com/