Wednesday, February 24, 2010

Vintage Thursday Thingie:1957 Cookbook

This strangely wonderful cookbook was a used bookshop purchase about 25 years ago. The World's Best Recipes was published in hardcover in 1955 and in paperback (for 35 cents!) in 1957.As this back cover blurb says: " Your shortcut to becoming a distinguished cook"...or at least reading distinguished people's recipes!
Here's a pound cake recipe from former First Lady, Mrs. Truman-its been in her family for generations.
Are you more interested in what a famous cartoonist likes to eat? Try this:
Into the history of food? Have no fear, this cookbook tells the story of waffles...apparently in 1204 a knight in shining armor sat on his wife's cakes as they were cooking!
Have I ever made a recipe from this book...no! Is it a great cookbook read...you bet!

For more vintage treasures, visit Coloradolady... you won't be disappointed.

Monday, February 22, 2010

String Quilt Possibilities

I've laid out some of the string blocks for DS's quilt on the guest bed...I love the black sashing and red cornerstones-I'm just not sure yet about the block arrangement. Here are three possibilities. This is interesting because of all the movement behind the sashing.
This is kind of dramatic.

What do you think?


Friday, February 19, 2010

News from Migdal: Quilting and otherwise

Interesting doings lately in our little village on the Sea of Galilee. We got a call the other day from the Rabbi of the new Reform congregation we're thinking of switching to...he was conducting a wedding for 2 Americans right on the shore of the Sea of Galilee and could we attend as they had no family with them. So we did and it was a lovely wedding-right at twilight-and we were the only guests! We had thought there would be members of the congregation there too but no! DH says he's done his good deed for the year! :)

Migdal has been in the news-even TV reporters have been seen all about. When we got back from the wedding, we stopped in at the corner grocery for milk and heard all about it.

Three years ago, a well known Rabbi from the center of the country (read big city!) relocated here for "health reasons". Now we know he relocated because of-you guessed it-scandal! He had been misbehaving with one or more of his adult students and it seems he has not mended his ways which is why its all coming out now.

One reporter from a big daily national newspaper wrote, "An important figure with many followers goes overboard and gets exiled to a faraway village in the north".Exiled! Faraway village! LOL!

Why do city folk think living out in the country is exile and why do they all want summer homes here?

Well, now that you're all caught up on the most exciting local news in years...here's some quilting news!

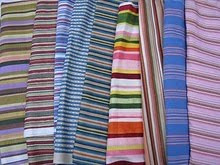
The fabric I ordered for a new commission just arrived and with it, the black fabric I need for DS's string quilt. I just love these bright fabrics on a grey winter's day!

Wednesday, February 17, 2010

Vintage Thursday Thingie: 1970 Modern Patchwork

I've blogged about this 1970 book before on VTT (back in 2008-you can see it here) and showed the oh so groovy patchwork clothing-today I'm going to treat you to the quilts.

Yesterday, while looking at blogs I came across the Modern Quilt blog where they're having an interesting discussion on what is a modern quilt. One writer showed this book and I think its very true-alot of these quilty ideas look like many quilts being made today.
Here's the back cover...a bit dreary except for that hot purple pillow....
but look at this wonderful quilt-it really does look like something new and modern! And its aqua!
This is a drawing of a possible quilt-I think I'd like to make this and the black, white and orange is perfect for today's quilts.
How about a hot pink optical illusion quilt...do you see those circles? Remember those pictures with the hidden picture...I was like that guy in "Mall Rats"-I could never see them!
But this has to be the best idea and one that we have all seen done in fabric all over quilty blogland! Have you noticed that the drawings in this book are so 1970-orange, hot pink and green!
Now if you don't think you'd make a quilt or a groovy skirt like on the cover-don't despair-this may be just for you!


Want to see more vintage treasures-hop on over to Coloradolady-she's hosting VTT.

Sunday, February 14, 2010

A Drunkard's Path Quilt using the Marti Michell template set: A Tutorial

My big block, 4-block, Drunkard's Path quilt top...well, almost, I still need to add the borders!
A close-up of one block...and the story of how it came to be.

I won the Marti Michell Perfect Patchwork Template set for Drunkard's Path style blocks in Karen's give away and was thrilled. Practically since I began quilting 20 years ago, I've wanted to make a Drunkard's Path quilt, a two color quilt and a yellow quilt and more recently Ive become attracted to big block or 4-block quilts. Here was my chance to do all of it! (BTW, there are block diagrams included in the template set for other blocks too!)

I decided to take you along and show you how I used these great templates: so here's my tutorial on using the Marti Michell Template set. ( BTW, block diagrams for blocks other than Drunkards Path are included with the templates.) I hope you can see these photos well-please let me know if you can't.

I already had enough yellow and white fabric and the template set, all I needed was the small rotary cutter which I got at my local quilt shop.
This set is the large size template set. For the convex piece-the pie piece- you cut a strip of fabric 5 1/2" wide by the width of the fabric. You do not need to open the strip-just trim off the selvage and lay the template flat on the strip, aligning the left side and the bottom with the cut edges and with the small rotary cutter, cut through all four layers of fabric.


Flip the template so that the bottom edge aligns with the top of the strip and cut-this time around the curve and down the straight edge.


Voila! Eight pie shape pieces cut-that's enough from one color fabric for all that color pieces in 1 block. (Since I was making 4 blocks, I repeated this with 3 more white strips and then for 4 yellow strips.)


For the other side of the unit, the concave piece, you have a choice as to the size you want to use. You cut squares and then use the template-the size of your original square is the size of the drunkard's path unit and determines the size of your finished block. Starting with a 6 1/2" square, you get a finished block size of 24", a 7" square yields a 26" block and a 7 1/2" square yields a 28" block-that was my choice and the largest size recommended. Hey, if I'm making a big block, I'm making a big block!

Here you can see I'm cutting the 7 1/2" square from a strip that is 4 layers of fabric...


and then immediately laying down the template, aligning the straight side and bottom of the template with the left corner of the fabric square....


and cutting around the template. I repeated this process until I had all 32 white pieces and then I did it again with the yellow fabric. Its went quickly-cutting 4 layers at a time- but I suppose I could have been a bit more adventurous and tried 8 layers!

Here's the cut pieces. You discard the bottom pie-like piece (or save it to use later-I'll post about what I do with them when I do something, right now they're just stacked up on a shelf!).

See how wide the fabric is above the curve on the top "L" shaped piece-that's because I started with a 7 1/2" square. The smaller 6 1/2" square would have less fabric above the curve.


BTW, you can use these templates even if you don't have a small rotary cutter. Lay the template down, the same way as I did but draw around the curved edge. I find its best to use a mechanical pencil so that your line is always the same thickness. (Remember to hold your pencil at an angle to your fabric so it writes smoothly.)


Here you can see I'm cutting on the marked line with fabric scissors.


See, the pieces look exactly the same...but remember I was able to cut 4 layers of fabric at a time with the rotary cutter and only 1 layer with the scissors.


I've shown how to cut the pieces using just the white fabric. Now that I'm going to show you how I sewed the units, in all the following photos, I used the yellow fabric for the "L" shaped piece (the concave curve) and the white fabric for the pie piece.

When sewing curves, I find it much easier to pin if I have some guides (like notches on a clothing pattern). There are no holes in these templates to use to make a pencil dot guide so I simply folded the fabric and made creases for guides.

Here's how: fold the "L" shaped piece in half, aligning the squared corners and the straight edges. Pinch with your fingers to make a crease.


Now, fold it in half again and pinch.


Here you can see the creases. They don't go all the way down, just about 1/2" from the curved edge...just enough.


I did the same thing with pie piece. First folding it in half...


and then in half again.


Here you can see the creases on this white pie piece.


I then laid the yellow "L" piece on the white pie piece, aligning the center creases and pinned.


Then I aligned the corners and pinned...


and then I aligned the creases between the center and corner pins...and pinned.


Then I smoothed out the fabric and aligning the cut edges, pinned between the pins....yes, for curves I use alot of pins.


Then it was off to the sewing machine. I slowly sewed so that I could easily make sure that I wasn't getting at tucks. I then pressed all the seam allowance towards the "L" piece.

Here's a finished Drunkard's Path unit. Sewing the units together is very easy-just like sewing plain squares of fabric together!


Thursday, February 11, 2010

Vintage Thursday Thingie: Opera Glasses

My mother-in-law loved to go to the theater, concerts and the opera. When you're laying out a quilt, do you know the trick of using binoculars backwards as reducing glasses so that you can see the whole quilt laid out as if you were standing far away from it? Years ago, my dear MIL saw me doing that, using my kids' plastic play binoculars...on her next visit she gave me these beautiful opera glasses in their pigskin case.

When she passed away, we got these wonderful late 1950s/early 60s cat eyes collapsible glasses with some of her other things. Aren't they just the best! Look at those rhinestones (or maybe glass!).

I can just see her sitting in her seat and raising this fashionable lornette to her eyes to just magnify the scene on stage a bit...was she checking out the costumes?


BTW, I just found a very similar pair on sale at Ruby Lane :)

More vintage treasures await you at Coloradolady-check it out.


Thursday, February 4, 2010

Crazy Quilt Pillow Finished

I've wanted to join Lit and Laundry for Finished for Friday for the past year and I've finally made it! I finished the crazy quilt pillow last night and will send it off today.
I'm really pleased with how it came out. I added more embroidery from when I showed the blocks a few days ago including this cute Kate Greenway design of a little girl sitting on a fence. I also added quite a few little silk ribbon flowers-they sew up so quickly. ( I accidently put the flowers upside down from the orientation of the girl :) but hey, its a crazy quilt! )
I also added some hand sewn french knots on some of the machine embroidered seams (the red embroidery in this pix) and on one plain machine zig zag seam, I added some lazy daisy stitches (the top little bit of white-look close :). Adding a little hand work to the machine stitches makes them a bit different from each other and adds to the variety-to me the whole goal of a crazy quilt-lots and lots of variation.
To check out the other Friday finishes, hop on over to Lit and Laundry...you'll like what you see (and its not all sewing either!)

Wednesday, February 3, 2010

Vintage Thursday Thingie: A Copper Finjan Coffee pot

This is a very old copper finjan. It is also called a cezve and in Greece its called a briki. .. whatever name is used, its a pot for making Turkish or Greek coffee. You simply boil together very finely ground coffee and water, often sugar is added too, then let the grounds settle a bit before pouring it into very small cups. It is quite strong! Once made over an open fire, the long handle helped the coffee maker not get burned.
You can see that this little coffee pot must have made alot of coffee...if only it could talk what stories could it tell.

To see more vintage treasures, visit Suzanne at Coloradolady, our weekly hostess for VTT and take your cup of coffee with you!

Monday, February 1, 2010

Pillows: Punchneedle and Crazy

Its been a crazy time around here...I just simply couldn't seem to get anything going sewing-wise. I finished the 42 string pieced blocks for DS's quilt but discovered that I had only a 1/4 yard of black fabric for the sashing-clearly not enough and then the local quilt shop was out of black fabric!!! I ordered some on-line but that will take a while to get here. I thought I'd piece the back of the quilt...but that didn't work out-I always seemed to be 17" short no matter what fabric I pulled from the closet (I even thought of a square and rectangle pieced back but when I pulled fabric I liked together...I was 17" short (not 16" or 18"-kind of spooky! ) I finally decided for forget working on his quilt for now and turned by attentions to some small projects that have been waiting in the wings: two pillows.

Remember this punchneedle I did last spring? Well, here it is as a pillow with, I think, a cute little plaid ruffle. Don't think the anti sewing gremlins had gone away...I first made this pillow too large and had to redo! I had this foam pillow insert that I wanted to use so the pillow had to be the right size...I don't know what I did but after I took off the older cover (you can see how badly this needed to be replaced-I'm actually embarrassed to show this but you know, it suddenly completely deteriorated-last time I washed it, it was fine...ok from the looks of it that must have been awhile ago!)

I had promised to send a crazy quilt pillow to our friend Gabby in Germany. She took me to meet her seamtress and she insisted that I take some fancy fabric scraps...I've made 4 8" blocks and now really just have more embroidery to add.
A couple of years ago, I taught several crazy quilt classes and had the bottom two blocks (in class demo blocks) left over, so I only had two blocks to make. Most of the on-the-seam embroidery I did by machine except for the bottom right block where it is mostly by hand. On some of the on-the-seam machine embroidery, I added, by hand, french knots-it really makes it looks nice and doesn't take very long.
Now I'll mark some more designs on the larger fabrics (like the little teapot) and embroider them with DMC floss and I'll also add some silk ribbon bouquets...I saw a nice pattern with flowers trailing along a fence I think I want to do.
To view some wonderful close-ups of antique crazy quilts-stop by Julie Silber's blog and you may get a party idea too!