Sunday, May 30, 2010

My UFO 9-Patch is finished and a UFO no more! and my Spring to Finish Challenge Final Report Card

Here it is...my UFO 9-Patch finished and a UFO no more! It is my second finish for the Spring to Finish Challenge from Jacqui at Tallgrass Prairie Studio and I got it done just in time-today is the end of the Challenge!Its fairly simply quilted but thanks to Debbie from Jerusalem Notes: Fiberwork from Debbie's comment I did add these little feathers in the light triangles. I auditioned several patterns for this space and wasn't happy with any until this one...funny little feathers aren't they. Actually for some reason they make me think of crabs (and scorpions-which isn't such a nice thought so I'm trying to forget that one!).
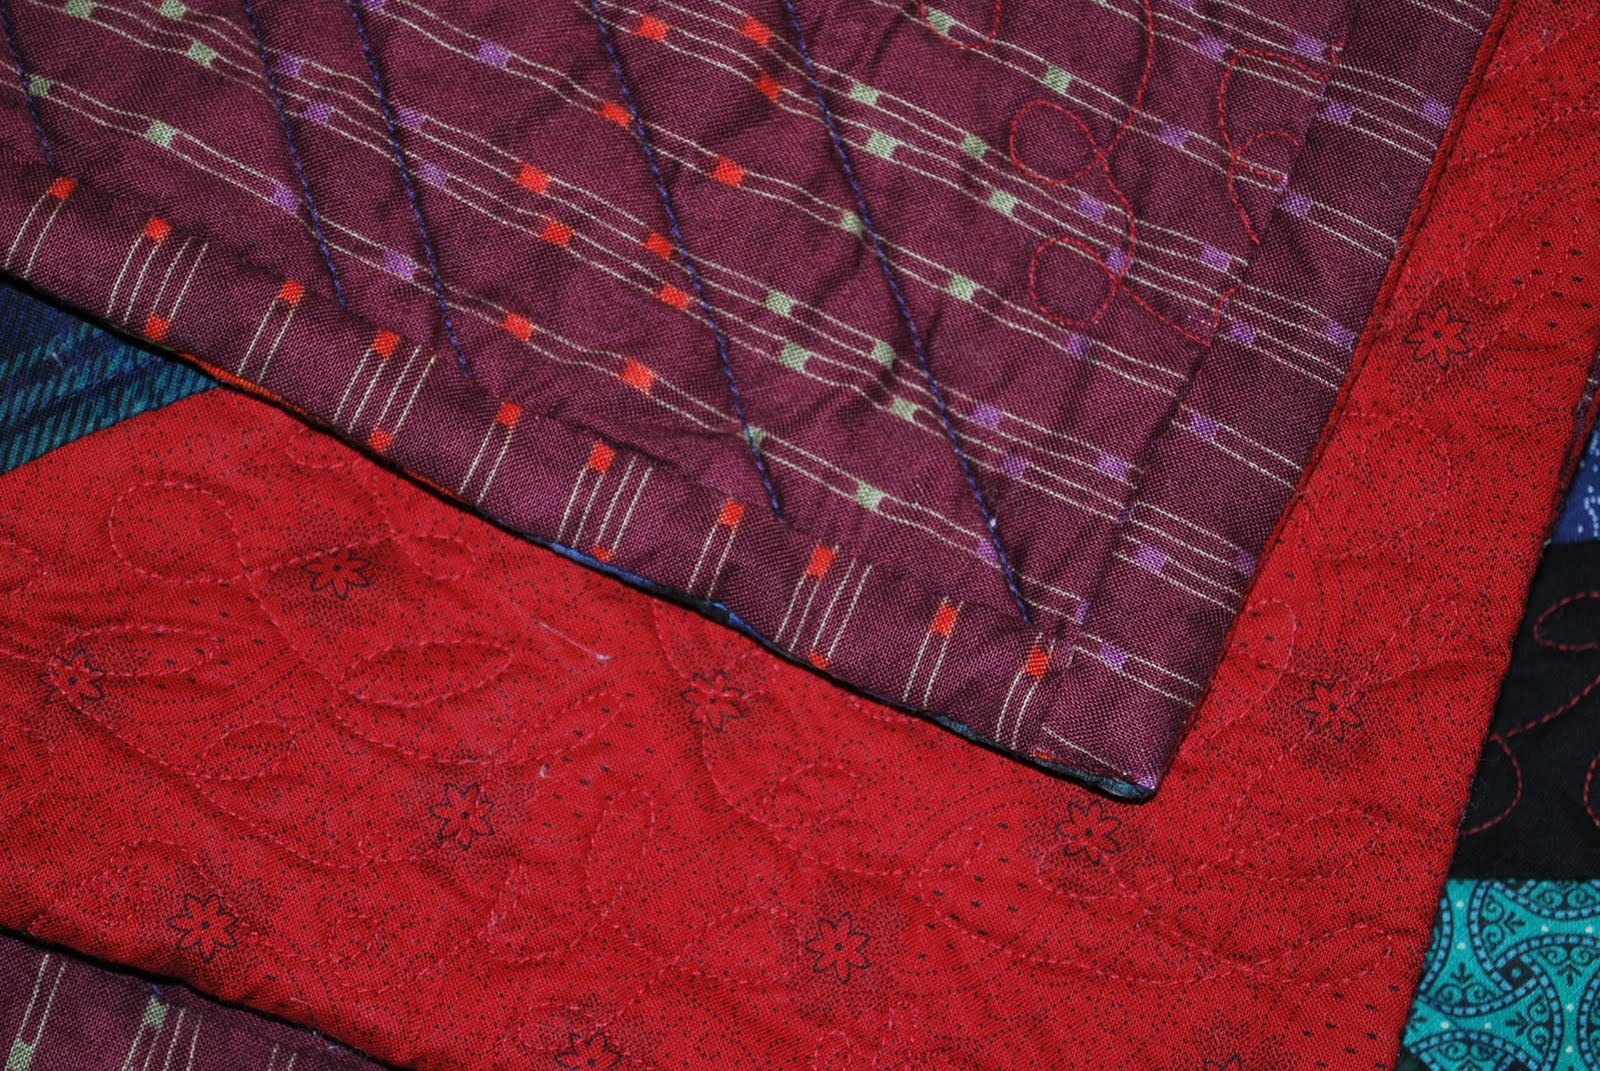
I just had to share the back...a few years ago a friend gave me several sample panels of barkcloth from her upholstery fabric store. I always knew I'd use them on the back of a quilt and have been waiting for just the right one. I just love contrast of the vibrant back with the very quiet front of the quilt. You can actually see the quilted cable in the border better from the back than the front.
I wish I could just free sew feathers like I see others do but I'm not there yet...so I used a stencil and my favorite washable graphite marker from Morgan Quality Products...I actually own two of these because if I ever lost one I'd go nuts!
A special thanks to Karen of Quilts,etc....I tried her machine zigzagging of quilt batting pieces and it worked like a dream. You can see the two batts are perfectly abutted together with no overlapping at all and this was so much faster than my old by hand way!
Now its time to give you my report card for this Challenge...I'm a very generous marker and I give myself a B+. I had 3 projects listed:.
1. Finish the String Quilt-done!
2. Finish the UFO 9-Patch top and quilt it-done!
3. Quilt my Black ,White and Red log cabin quilt - I've taken the top and backing fabric out of the closet...that's it-all I have to report.

So why am I giving myself a B+ instead of a C...well I did some extra credit work! :) I finished the two pillows that had been hanging around for quite a while!

Now I'm hopping over to Tallgrass Prairie Studio to see all the fabulous finishes for the Spring to Finish Challenge!

Thursday, May 27, 2010

String Quilt Finished with Knife Edge Binding

Tada! Finally, my string quilt full size quilt is finished and I love it...and more importantly so does DS!Here's a close-up. I machine quilted loopty-loops in the red areas and on the sashing and straight line 1/4" outline style quilting on the strings.
All folded up and ready to go to its new home...DS's apartment!
Here's a close-up of the Knife Edge finish I used....I didn't want a black binding and I had no red fabric left so I decided to finish the quilt this way. Its a technique I learned from an unknown quilter...the quilter that made my vintage red and yellow tumbling blocks quilt and I thought I'd share with you how I did it.
Putting on this binding is like adding another border to a quilt...it is not a continuous binding.
I prepared my binding strips for the top and bottom of the quilt exactly the same way I would a border-only its a 1" border!

You can see the binding pinned onto the quilt...notice the pressed down edge-I pressed 1/4" of the long edge of the binding strip for ease when sewing it to the back.
Binding machine sewed on with a 1/4" seam.

I then pulled the entire binding to the back (including the seam allowance-the whole thing!) and pinned.
Here you can see how it looks from the front as I pulled the binding to the back and pinned. Once completely pinned, I sewed the top and bottom bindings to the back of the quilt by hand-the whole idea is that nothing shows on the front so you kind of have to sew the binding to the back by hand.

Now for the side bindings. They're almost exactly the same...the exception is that I cut them 1/2" longer than I would have if they really were a border for the quilt so I could fold under 1/4" of the short sides. This way there will be no raw edges when I finish the binding.
Next I pinned the side binding on....you can see that the top binding is completely finished and I've aligned the short folded edge of the new binding to the finished edge of the quilt.
View of side binding sewn on from the front of the quilt...
View of side binding sewn on from the back of the quilt. (See how I sewed over the finished binding.)
I then pulled the side bindings completely to the back, pinned and sewed by hand...and that's it-a machine sewn (well, mostly) knife edge finish!

While not my regular binding choice, I have used this on other quilts when it just seemed the perfect finish.

This is my second finish for the String Quilt Challenge and my first finish for the Spring to Finish Challenge 2010.

I'm also linking to Finished for Friday and Sew and Tell. Hop on over and see all the wonderful finishes!

Wednesday, May 26, 2010

Vintage Thursday Thingie: 1970s sewing machine

Care to whip up a peasant skirt or turn your jeans into bell bottoms? Bet this Singer Starlet sewing machine has been there and done that! Look how trim it looks in its carrying case!


And open...its a perfect 1970s orange and green!
This terrific looking sewing machine is not mine-its my friend Hannah's. Her husband found it next to the rubbish bin! and brought it in for her to look at and she brought it right over. They were afraid to try to see if it sewed-'course I wasn't! We opened it up and threaded it (a bobbin was already in) and I could see that it was really dirty inside. We plugged it in....and it sewed :) but not correctly :(. She's taking it over to the sewing machine man in Tiberias for a good cleaning and then a diagnosis....the motor is good and I'm hoping the problem is minor (or maybe just because of the dirt). I'll let you know ....I sure hope this beauty gets well soon.

To see more vintage treasures, hop on over to Coloradolady-our lovely hostess for VTT.

Monday, May 24, 2010

UFO 9 Patch Finish and an Award

I've been just chugging along. I'm sewing the binding to the back on DS's quilt and I've put the borders on the UFO 9 patch and pieced the back...next up is basting!
Pati at A Crafty Escape is so nice. She gave me this lovely Versatile Blogger award. Thanks, Pati.The Rules for the award are:
1. Thank the person who gave you this award
2. Share 7 things about yourself.
3. Pass the award along to 15 bloggers who you have recently discovered and who you think are fantastic! (in no particular order...)
4. Contact the bloggers you've picked and let them know about the award.

7 Things about me:
1. The name on my birth certificate is Merryl. :)
2. I love bad horror movies-the dopier it is, the happier I am.
3. I don't have a green thumb so having pity for the plants I don't garden. If someone gives us a houseplant as a gift, straightaway DH and the kids start guessing how long it will take me to kill it. (Really, one week is a bit ridiculous-one month is much more realistic.)
4. My favorite food is cheese!
5. I like cooking...
6. I love baking...
7. I hate housework! Laundry is the bane of my life.

Now I've come to the hard part...15 versatile bloggers! Just 15...impossible! So all you versatile bloggers out there just help yourselves to this award. Let me know and I'll link back to you here on my blog...I'd love to know 7 more things about you!

Saturday, May 22, 2010

More fun: Spring Fever Bingo

So much fun is happening in Blogland right now...to join in a quilter's bingo game hop on over to The Quilt Shoppe. You have to hurry though - the game starts on Monday and registration is over on Sunday at midnight PST. Good luck with Spring Fever Bingo!

Friday, May 21, 2010


For the 2010 Spring Bloggers Quilt Festival, I'm showing this Crazy Quilt that I made before I started blogging and have never shown on my blog. I used many different fabrics including velvets, silks, satin, sateen and cottons. Some of the fabrics are Japanese. The embroidery on the seams was done on the sewing machine while the rest of the embroidery was done by hand.
Here you can see that I used a Kate Greenaway little girl with a hat as well as a bird and some silk ribbon flowers. I also used an English paper pieced hexagon flower that I had made years before...I like how it looked mixed in with the crazy patches. There's a basket of flowers embroidered in the center of the hexagon flower.
The fan is one of my favorite parts of this quilt...I really like the silk ribbon flower vines. There are also silk ribbon flowers growing on two other patches.
In this section I added a cut out lace motif-it hasn't photographed very well and is overly white and bright. There's also another Kate Greenaway design-this time a little boy and some more silk ribbon flowers.
Here you can see, besides the center medallion flower vase, some classic crazy quilt embroidery designs: a pair of owls, a fan, and bird. You can just see part of my initials from the bottom corner of the quilt.
I enjoyed making this quilt-I especially enjoyed adding the embroidery. Some of the designs I marked but many of the smaller designs just freely developed and I really liked just adding silk ribbon flowers wherever.

This year I made a crazy quilt pillow for a very dear friend in Germany...you can see it here.

It is always fun to participate in Amy's Bloggers Quilt Festival and there are so many wonderful quilts to see.

Wednesday, May 19, 2010

Vintage Thursday Thingie: Silver Compact

Last week as I was putting away my Samsonite luggage piece, I decided to poke about in the little pocket inside and look what I found! This little silver plated piece was sadly in need of some polishing (and if you look close, you can see the job is not yet finished) and under all that black tarnish I found this...and on the other side-this! A lovely umbrella girl! Now you know I just love umbrella girls-I would say this one dates from the 1940s. Look closely at her hair...can't you see her pompadour?
Did you notice the wonderful work on the handle? It should open and I bet there's a lipstick inside but it was a little stuck and I'm a big chicken and afraid I'd break it so I left it alone. But the compact opened easily...it looks hardly used!
To be honest, I have no idea when or where I got this silver compact...it was a complete surprise to me. So besides checking out all the lovely treasures being shared today over at Coloradolady...go check any old suitcases lying around-you never know what you may find!

Friday, May 14, 2010

Two Pillows Finished!

I finally finished up these two pillows. This first one, a string quilt project for the String Quilt Challenge at Loft Creations, was delayed by my never finding the time to finish up the embroidery but at last its done-before Spring is over!This punchneedle (the design is from a vintage Pennsylvania quilt) has been waiting even longer to be finished...about a year! I like the cute little plaid ruffle. This looks great on a dark wood chair and also on the new slipcovers on our sofa.
I'm linking today to Finished for Friday at Lit and Laundry and to Sew and Tell at Amy Lou Who. Stop on by both and see the wonderful projects finished this week!

Wednesday, May 12, 2010

Vintage Thursday Thingie: Samsonite Luggage

"If you traveled the way your luggage does, would you look as good as Samsonite?"
This Samsonite Silhouette make up case is from 1968...I don't remember what happened to the other two pieces I had but you can see the whole set in the ad. My parents bought me the set as a high school graduation gift and I certainly did use it...you can just read the MSP (Minneapolis-St. Paul) tag on the side.
The Samsonite line of luggage was begun around 1910 at the Shwayder Trunk Company in Denver, Colorado-the case was actually named Samson to emphasize how strong it was. In 1941, the trademark Samsonite began to be used and in 1966 the whole company was renamed for this very popular luggage line. Today, unfortunately, Samsonite is in Chapter 11...lets hope it survives.

Silhouette was launched in 1958 as the Jet Age luggage...not sure what is Jet Age about this piece (it is really quite heavy) but I do love the styling.


Did you have luggage with a combination lock? Was your combination your birthday or the ever popular 000? (Yes, those are my old initials :)

Do you remember this ad? According to Wikipedia this iconic ad is used as an example of branding even though most people think this was a Samsonite ad (me too!) which it actually wasn't!

Join in the fun of VTT and hop on over to Coloradolady to check out all the vintage treasures being shown this week-you won't be disappointed!

Monday, May 10, 2010

9 patch progress and a little tip

I've made some progress on the UFO 9-patch quilt....the center is all sewn together and ready for borders.I really like how the quarter square triangles give an on-point look.

Here's the top laid out on the bed (I always take a picture so I'll know the order I've decided on) and here's a little tip for anyone else who lays their tops out on the bed.
When I've sewn the blocks into rows and then lain out the rows to sew the top together, I pin the seam allowance to the "correct" side for each row...for me that's odd numbered rows to the left and even numbered rows to the right.
This way when I lift the rows (to take them downstairs) to iron them, I don't have to worry about whether or not I'll mess up the order-I know the direction to press each row by the pins.

I'm off now to quilt on DS's quilt!


Wednesday, May 5, 2010

Vintage Thursday Thingie: Blue and White Porcelain

Today I'm sharing two Blue and White Arita ware Japanese tea cups. This one has various designs encircling the outsite set off within lozenges. The first one here is little miniature landscape...see the tree and the sun? it makes me think of a desert island. The second is of a large "tulip" tree. This is a very small cup, only about 2" tall and 2" around.


Inside, on the bottom of the cup, to be see only after finishing your tea, is this wonderfully strange landscape of pointy mountains, clouds and moon and a very interesting bird. The rim of the cup is a bit fluted...not so very common in Arita ware.


Here are the marks but I haven't been able to get an identification.... here's a good on-line source for marks-including modern Made in Japan marks that while it didn't help me, may help some of you. Without being able to completely identify the mark (I have found two of the characters on other pieces) I'll have to take a guess at the age...late 19th century seems pretty safe to say.


Did you notice the fret design around the bottom of the cup and the small design around the rim? Horror vacuii Japanese style! :)


This second Arita ware tea cup is a bit larger...about 3" in diameter and height. It has an all around floral decoration


in a more muted and delicate blue. It has no marks and no design inside the cup...its much simplier than the first but the design is lovely. This cup is probably quite a bit older than the first...it may even be pre-Meiji (1867).


Arita ware is the blue and white parent of colorful Imari ware (you can see my lidded bowl here). Blue and white underglaze decorated porcelain began to be produced at Arita in the 17th century and is still produced today. Here'a a video showing just how underglaze blue decoration is painted-then and now! That's a calligraphy brush in his hand!


Hope you enjoyed seeing my little art treasures!

For more vintage treasures, hop on over to Coloradolady and join in the fun.


Tuesday, May 4, 2010

Spring to Finish Challenge


I just heard about the Spring to Finish Challenge hosted by Jacquie at Tallgrass Prairie Studio...its just perfect for me! I've already gotten started on the 9-patch UFO blocks.

Here's my list of to-dos:


1. Finish quilting DS's String quilt (for the String Quilt Challenge!).

2. Finish the 9-patch quilt top and quilt it.

3. Quilt another quilt top that's in my closet (not sure yet which one but I'm thinking either another little string baby quilt or the black, white and red log cabin I did for the Black and White Challenge ).

I like this...use this challenge to finish up the fun projects from earlier challenges....would you say I need the encouragement of challenges?

If you do too, just use the link above...its not to late to join!

And to show how badly I need this boost, here's a photo of what I've quilted on DS's quilt so far...One long diagonal row. and now I'm not sure that DS will like the red quilting on the black sashes...it was just so much easier to just keep going down the row with the same quilting! :) He's coming this week-end so I'll found out soon enough (hmm, maybe I'd better work on another project til then.)

It was very hard to take a picture...the quilting only showed up in this close-up. You can see the whole quilt top her

Sunday, May 2, 2010

UFO 9-patch blocks are finally becoming a quilt

I've had these blocks in the closet for quite a while. A few years ago, I made a 9-patch quilt for someone and had leftover strip sets so I made these 12 blocks.
I had set the original quilt on point with a plain square of this fabric alternating with the 9 patch blocks.
I really loved it and would have been happy to dublicate it for myself but I have only a quarter yard of this paisley left....that's why the blocks have been in the closet for years. I just couldn't get that quilt out of my head and I couldn't think of anything else to do with the blocks...anything I would really like that would have some of the same voluptuousness as the first quilt. (Can you call a quilt voluptuous?)
These are the rest of the fabrics leftover from the first quilt, I took them out of the closet and ..hmm, I suddenly knew what I wanted to do.
I'm going to use this quarter square triangle block as the alternating block.


I have to make 3 more 9 patch blocks and I've made the quarter square triangles blocks already. I think this is going to look good! Simple but good!