Showing posts with label drunkard's path quilt. Show all posts

Friday, October 21, 2011

Happy Circle Quilt

When I was in Boston last spring, I hand pieced the quarter circles I had left over from cutting my yellow and white Drunkard's Path quilt but I hadn't done anything with the circles. I was thinking about it however.

I wanted to machine applique them but I didn't want to do raw edge applique. So I decided to use non-woven iron-on interfacing. I thought of the shiny (glue) side of the interfacing as the right side and I pinned the circles to a rough cut square of the interfacing-right sides to right sides.
Then I sewed with a 1/4" seam allowance around the circles, trimmed the interfacing, and carefully slit the back of the interfacing.
Then I turned the circles out...
and laid them on red and white striped square and pressed. The iron-on interfacing held well enough that I could sew them (using a buttonhole stitch) without any pins.

The circles were about 9" and I played around a bit with the size of the striped square until I decided I liked a square that would finish at 11". (Any bigger and I thought the red was too dominant.)

I wondered if the interfacing would act as a lining and not let the red stripe show through but it didn't, so I cut out the centers.
Then I started playing with them on my design wall and I liked them off-set. It just added to the fun.
So I sewed it all together with sashing that finished at 3", then added a 3" outer border in white too and a fun red and yellow 3" square outer border.
I'm linking to Finished for Friday at Lit and Laundry and to Can I Get a Whoop Whoop. Hop on over and see all the terrific stuff happening.

Friday, March 25, 2011

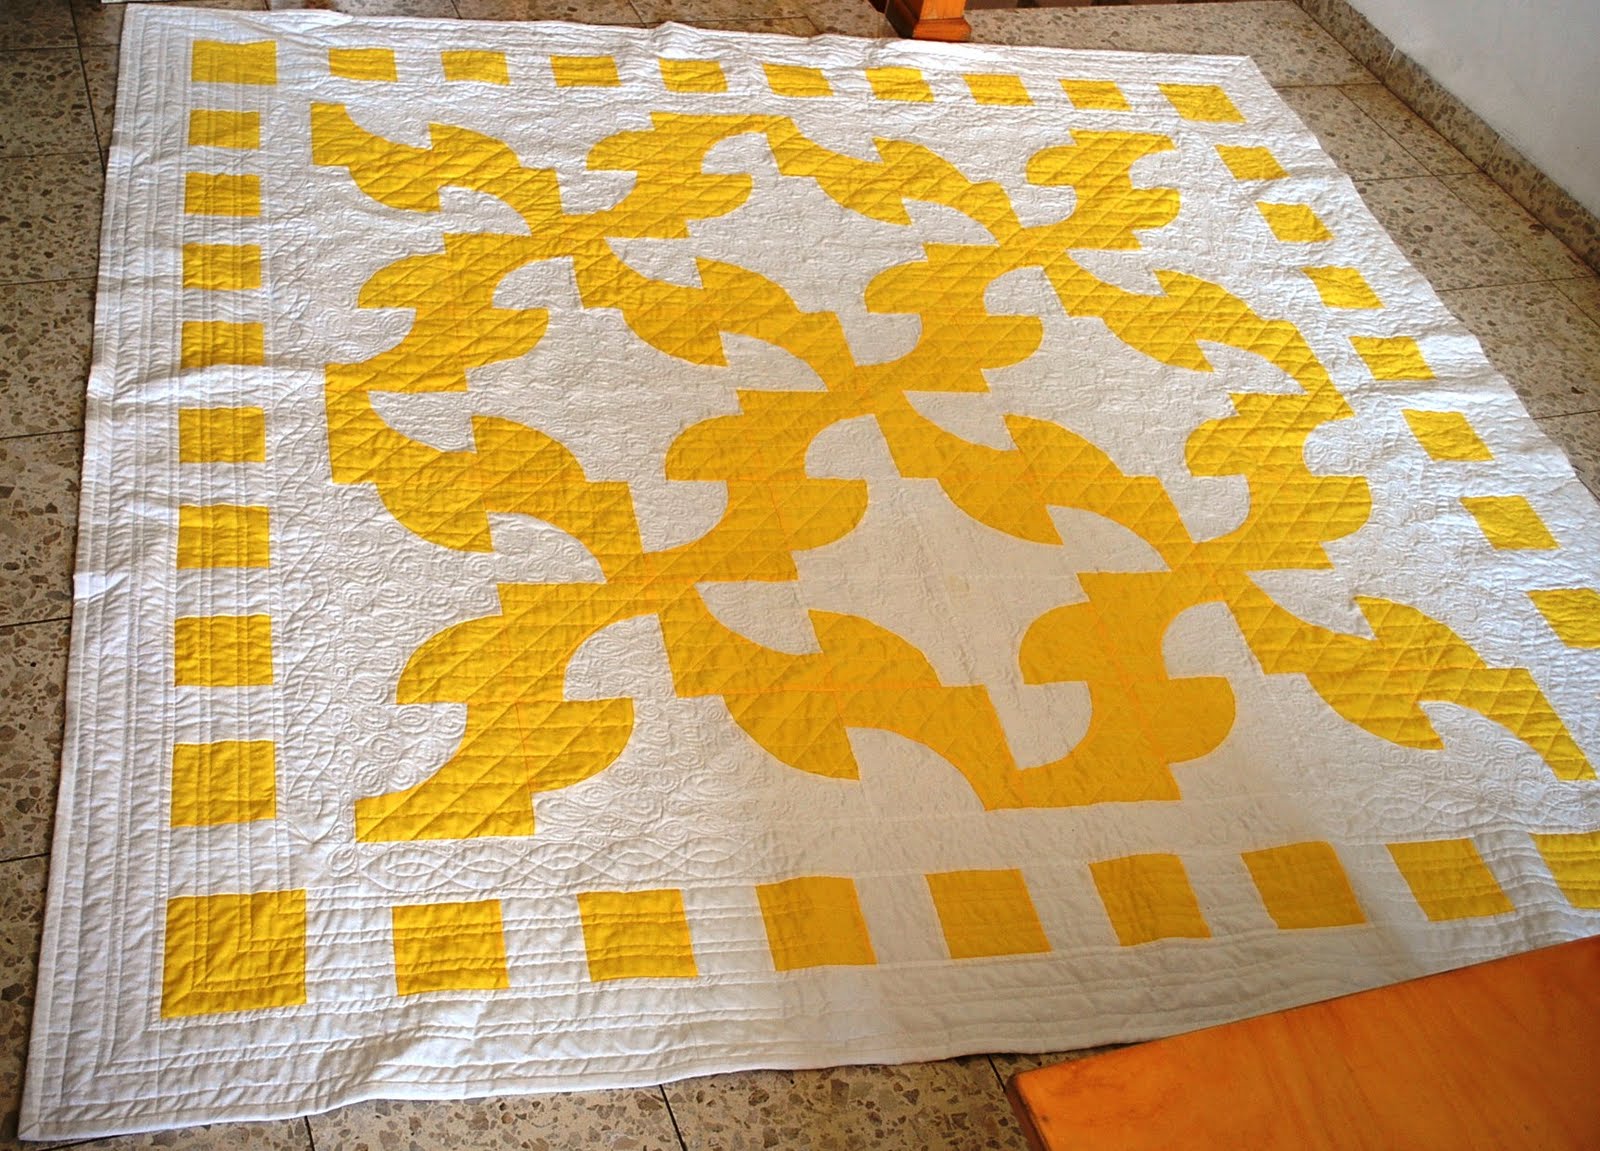
Drunkard's Path Quilt Finished!

This quilt was put on hold for so long but its now finished! Completely quilted and bound! In the end I was so pressed for time I quilted simple parallel lines 1/2" and 1" apart as the final border quilting.
As good as the front looks, I think the back is just gorgeous! Its hard to see in the photo but the triple ring "flowers" just appear out of nowhere in the midst of the hanging diamonds and I just love the look. I'm glad this quilt isn't going anywhere but on our bed.
Here's the quilt folded on a chair. You can see the four different quilting designs I used: the parallel lines, the cable, the hanging diamonds crosshatching and the triple circle free motion design.

You can see my tutorial for using Marti Mitchel's rotary cutting templates for the Drunkard's Path here.
Special thanks to P at The Way I Sew It: seeing all your free motion design experiments inspired me to have a go with the triple ring/circle design and I'm so glad I did. It took a long time and used a ton of thread but oh, it looks so good! I'm definitely starting to love machine quilting.

I'm linking up to Finished for Friday at Lit and Laundry and Sew and Tell at Amylouwho. Hop on over and see all the wonderful finished this week.

Wednesday, March 23, 2011

Beginning Two Bright Modern Quilts

There's been some exciting and unexpected news: I'm off to Boston next week! A shout-out from the kids is why. Tali's Mom has been with them since the twins' birth but she's leaving on Sunday...I'll get there on Thursday...they want a few days to try it out alone ! (But apparently not too many days! LOL!)

Sooo Jane has been put on hold and I've been having fun making some quilts for the girls. What a pleasure to be just quick cutting and sewing fabric!

I made a quick stop at Moda Bake Shop because I knew I wanted to make a modern quilt and that seemed like a good place to look for a quick and easy pattern. Sure enough, there was just the thing from Jaimie at Sunflower Seeds. I used her block design but I changed the size because I had only just so much of the bright fabrics I wanted to use and a lot of it was already cut into 5" lengths (leftover from a commission quilt I did).
The other quilt I've been aching to make for a while...yes, one of those coin quilts that I've seen just about everywhere. Well, here's my start on it. Its a bit of a mixture of a coin quilt and a string quilt because I've used different width strips! I wanted the twins' quilts to be different and yet the same and I'm getting there-different patterns but many of the same fabrics and the same bright summery feel.
Now its time for the borders and I'll have to work out something for the first one as my blocks are a lot narrower than in the original.

I've also finished the machine quilting on the Drunkard's Path (finally!) and I'm sewing the binding down. Yippee!

Wednesday, December 29, 2010

A little machine quilting and a little Jane Stickle quilt progress

What a busy time of year! With house guests, classes and all I've hardly had time to quilt, visit blogs and except for Tuesday Tomes I haven't posted in weeks!

I did get one day to mark the Drunkard's Path quilt and because of the discussion here on using the Hera Marker I decided to try marking a cable using it...it worked. I've usually just used it for straight lines but you can see in this pix the Hera marks and the one line already quilted. Its actually quite easy to see under the light of the sewing machine...and it must have been at least 10 days between when I marked the quilt and actually quilted!
Here's the cable completely quilted...
and here I added the free motion design right up to the edge of the cable...I've always wanted to do this on a quilt. And this is how the quilt sits...I now want to continue the "flowers" on the other side of the cable and between the yellow squares-I'm hoping to get to it soon. I've often taken months to finish a hand quilted quilt but this is the first time I've been so busy that a machine quilted quilt is languishing!
I have been sewing Jane blocks...well I sort of have to if I want to be ready for class! I am enjoying hand appliquing these blocks...
I always baste up an entire block of whatever I'm working on and then I can just sit and applique when I have time (usually sitting on the sofa next to DH in the evenings). The block on the upper right was curved pieced and then the little diamonds appliqued...
the bottom left was reverse appliqued-I haven't done much of that and totally enjoyed it! On the bottom right is a whole pile of basted blocks just waiting to be finished.

I'm now paper piecing some blocks...not my favorite technique but useful for those blocks with teeny tiny pieces-pix will follow.

Hope you all are having a wonderful holiday season! (and those on the East Coast are enjoying the snow!)

Monday, November 22, 2010

I've been quilting

I've been busy with classes but I have done some machine quilting on the Drunkard's Path...I'm still working on the white areas and then I want to go back and add something in the yellow-I'm thinking of a diamond grid-the parallel lines are just too "straight" but I'm not sure yet. Its a lot of fun doing the free triple circle "flowers" in the white but they do take a lot of time and a lot of thread-I can't believe all the bobbins I've made!I've also been hand quilting on the Double Wedding Ring...I think I'm about half way now. I took this pix at night but I think you can see that I've quilted in my name-using a 30s style printing. (The color is a little yellow but with the flash it was totally washed out.)
Isn't this just a gorgeous feedsack? The friend that gave me this one, the next one and others that I used in the DWR is here visiting and will be joining us for Thanksgiving dinner! We'll be about 14 this year-American friends from all over Israel-its really a lot of fun and a lot of good food.

Friday, October 22, 2010

Drunkard's Path Quilt Top Finished!

My drunkard's path quilt top/flimsy is finished! I thought about the border all summer and I'm so glad at how it turned out. Its really a happy quilt! I'm planning on basting it on Tuesday (DH plays bridge in the morning so the floor will be mine) and now I'm thinking about how to quilt it...any ideas?

The Drunkard's Path was really easy...the large curves were a cinch to sew. I used the Marta Michell templates (that I won in a give away at Quilts...etc) and you can see my tutorial here. Rotary cutting the pieces was so much faster than drawing around a template and then cutting with scissors.

I'm linking to Finished for Friday at Lit and Laundry and Sew and Tell at Amylouwho. Stop by there and see all the lovely finishes for this week.

Sunday, October 17, 2010

This, That and a Recipe

It has been a fun and busy week. I finished another punch needle block and I think this one is my favorite so far...
and I started working on the border for my Drunkard's Path quilt! That has been a long time a-waiting.Last Sunday, Beth of Love, Laugh, Quilt, while on a visit to Israel, stopped off at the LQS, The Quilt Center, where I was teaching. It was so nice to actually meet a blogging friend.

DH went to the beach while I was teaching with the plan being that I would join him for the afternoon and then we'd pick up DD at the train station (Gotta love that Train to the Plane!-or in this case Plane to the Train.) The beach is just about ten minutes north of the shop but suddenly the weather completely changed...turning first cloudy and then by the time I got to the beach-drizzle. So what should we do until the train came in?? Hit the mall, what else!

Off we went to be dry and kill some time, window shopping. We thought we'd go to the movies but there were no shows until 5 pm-too late. But next door to the movies was an Arcade! Oh boy, did we have fun with that hockey game and the basketball game...two old geezers just having a jolly old time of it.

There are lots of benches in the main aisle of the mall, so Dan went off to sit and read the newspaper and I tailed along...and there right in front of his bench was a kiosk selling...

Now I have had curly hair all my life but as I got older it became much less curl and more frizz.
I am happy to say that with this wonderful gizmo my head is now a Frizz Free Zone. This is so fantastic...so easy to use and the results are fabulous. Much better and easier than using a blow dryer and a round brush. DD and I had fun giving her straight hair some curls too-after swimming in the Sea of Galilee in the morning, we had a home salon in the afternoon! :)

The next day, was Girls Day (DH was at bridge)...we went shopping for clothes for her (I got a sweater too) and then on a lark, we rented a motor boat for half an hour and had a wonderful time boating on the Sea of Galilee.

DS and DD's good friend since high school came up to help celebrate her birthday...I loved the timing of her work related trip to Istanbul-she could pop over to see us for a week before returning to NYC and was here for her birthday!

I made a huge dinner including her favorite chicken dish...absolutely the easiest chicken recipe ever-Plum Chicken. (You can just see our festive table with a bright yellow tablecloth and pink dishes!)
All you need:

1 chicken cut into eighths (quarters work too)
1/4 cup onion soup powder (1 packet Liptons onion soup)
1 can plums (16 oz./approx. 500 grams-and make sure its purple plums and not prunes)

Arrange the chicken pieces in a casserole and sprinkle on the onion soup powder.
Open the can of plums, pour the syrup over the chicken...
cut the plums in half and remove the pits (if it isn't canned pitted and halved) and arrange on the chicken pieces.
Cover and put it into a cold over. Turn the oven to 400 degrees F/200 degrees C for 1/2 hour. Lower temperature to 350 F/175 C for 1 hour. Then take off the cover -it will look like this just barely browned...
return the chicken to the oven for another 1/2 hour to finish browning and for the sauce to reduce.
Mmmm!

Sunday, February 14, 2010

A Drunkard's Path Quilt using the Marti Michell template set: A Tutorial

My big block, 4-block, Drunkard's Path quilt top...well, almost, I still need to add the borders!
A close-up of one block...and the story of how it came to be.

I won the Marti Michell Perfect Patchwork Template set for Drunkard's Path style blocks in Karen's give away and was thrilled. Practically since I began quilting 20 years ago, I've wanted to make a Drunkard's Path quilt, a two color quilt and a yellow quilt and more recently Ive become attracted to big block or 4-block quilts. Here was my chance to do all of it! (BTW, there are block diagrams included in the template set for other blocks too!)

I decided to take you along and show you how I used these great templates: so here's my tutorial on using the Marti Michell Template set. ( BTW, block diagrams for blocks other than Drunkards Path are included with the templates.) I hope you can see these photos well-please let me know if you can't.

I already had enough yellow and white fabric and the template set, all I needed was the small rotary cutter which I got at my local quilt shop.
This set is the large size template set. For the convex piece-the pie piece- you cut a strip of fabric 5 1/2" wide by the width of the fabric. You do not need to open the strip-just trim off the selvage and lay the template flat on the strip, aligning the left side and the bottom with the cut edges and with the small rotary cutter, cut through all four layers of fabric.


Flip the template so that the bottom edge aligns with the top of the strip and cut-this time around the curve and down the straight edge.


Voila! Eight pie shape pieces cut-that's enough from one color fabric for all that color pieces in 1 block. (Since I was making 4 blocks, I repeated this with 3 more white strips and then for 4 yellow strips.)


For the other side of the unit, the concave piece, you have a choice as to the size you want to use. You cut squares and then use the template-the size of your original square is the size of the drunkard's path unit and determines the size of your finished block. Starting with a 6 1/2" square, you get a finished block size of 24", a 7" square yields a 26" block and a 7 1/2" square yields a 28" block-that was my choice and the largest size recommended. Hey, if I'm making a big block, I'm making a big block!

Here you can see I'm cutting the 7 1/2" square from a strip that is 4 layers of fabric...


and then immediately laying down the template, aligning the straight side and bottom of the template with the left corner of the fabric square....


and cutting around the template. I repeated this process until I had all 32 white pieces and then I did it again with the yellow fabric. Its went quickly-cutting 4 layers at a time- but I suppose I could have been a bit more adventurous and tried 8 layers!

Here's the cut pieces. You discard the bottom pie-like piece (or save it to use later-I'll post about what I do with them when I do something, right now they're just stacked up on a shelf!).

See how wide the fabric is above the curve on the top "L" shaped piece-that's because I started with a 7 1/2" square. The smaller 6 1/2" square would have less fabric above the curve.


BTW, you can use these templates even if you don't have a small rotary cutter. Lay the template down, the same way as I did but draw around the curved edge. I find its best to use a mechanical pencil so that your line is always the same thickness. (Remember to hold your pencil at an angle to your fabric so it writes smoothly.)


Here you can see I'm cutting on the marked line with fabric scissors.


See, the pieces look exactly the same...but remember I was able to cut 4 layers of fabric at a time with the rotary cutter and only 1 layer with the scissors.


I've shown how to cut the pieces using just the white fabric. Now that I'm going to show you how I sewed the units, in all the following photos, I used the yellow fabric for the "L" shaped piece (the concave curve) and the white fabric for the pie piece.

When sewing curves, I find it much easier to pin if I have some guides (like notches on a clothing pattern). There are no holes in these templates to use to make a pencil dot guide so I simply folded the fabric and made creases for guides.

Here's how: fold the "L" shaped piece in half, aligning the squared corners and the straight edges. Pinch with your fingers to make a crease.


Now, fold it in half again and pinch.


Here you can see the creases. They don't go all the way down, just about 1/2" from the curved edge...just enough.


I did the same thing with pie piece. First folding it in half...


and then in half again.


Here you can see the creases on this white pie piece.


I then laid the yellow "L" piece on the white pie piece, aligning the center creases and pinned.


Then I aligned the corners and pinned...


and then I aligned the creases between the center and corner pins...and pinned.


Then I smoothed out the fabric and aligning the cut edges, pinned between the pins....yes, for curves I use alot of pins.


Then it was off to the sewing machine. I slowly sewed so that I could easily make sure that I wasn't getting at tucks. I then pressed all the seam allowance towards the "L" piece.

Here's a finished Drunkard's Path unit. Sewing the units together is very easy-just like sewing plain squares of fabric together!