Showing posts with label punchneedle quilt. Show all posts

Saturday, August 13, 2011

Punch Needle Quilt: Block 8 finished

I just finished another block for my punch needle quilt. I chose this block to do because I wanted one that wasn't symmetrical like most of the blocks are. I used the purple and I like it but I liked it even more with the orange accents in the other block.

One more to go and I'll think about whether I'm happy with 9 blocks or if the quilt needs more-maybe 12.I have to think about sashing or no sashing and I'll have to think more about the border-right now I'm thinking of a punch needled vine with flowers.

It finally cooled off here a little-its been sooo hot.

Monday, July 18, 2011

A new blue floral punchneedle quilt block finished

We had a lovely morning swimming in the Sea of Galilee (actually a lake)-our first time this summer. We've been driving an hour to the ocean (actually the Mediterranean Sea) instead of just the 5 minutes to the lake but now the jelly fish have taken over the sea so we were off to the lake. We try to go early in the morning because by 1 o'clock in the afternoon it gets too windy.

After we came back, I finished up another punch needle block.
So now there are 7. Here are the six I finished earlier.
You can see my punchneedle tutorial here.
I'm linking to Design Wall Monday at Patchwork Times so hop on over and see lots of gorgeous work in progress.

Thursday, July 7, 2011

Punch Needle Quilt: Block 6 finished

I finished another punch needle quilt block...don't you think I work fast? LOL! This block was partially completed last summer-I had done the flower but I had run out of the green pearl cotton so it languished all winter!There are now 6 completed blocks and I'm really liking how they all look together on my design wall. This looks like a lot of red but it really isn't. Two of the blocks have the variegated thread, one a hot pink and only the one is truly red.
I've posted a punch needle tutorial here if you'd like to try this. Its fun, its fast and it's an easy take-along-to-the-pool summer project.Best of all, it looks like nothing else with its unique texture!

I'm linking to Design Wall Monday at Patchwork Times(I know, I'm so poky!), Finished for Friday at Lit and Laundry and Sew and Tell at AmyLouWho (now I'm an early bird so the links will go up tomorrow!:). Stop by and see all the wonderful projects everyone has going!

Monday, July 4, 2011

Punch Needle Tutorial


Last week when I posted my newest punch needle quilt block, several people commented that they were interested in punch needle and a punch needle quilt but had never done it. I thought I would post a punch needle tutorial to help people get started.

Here's what you need to get started: A punch needle, a threader, pearl cotton # 5, muslin (or white bleached muslin), a pattern to draw or trace onto the wrong side of the fabric and an embroidery hoop-size 6".

Punch needle can be done with many different kinds of threads or yarns...since these are punch needle quilt blocks, I'm using Pearl Cotton. There are many different types of punch needle needles-some of them have a dial that can change the size of the loop that the needle makes. I prefer using a needle that doesn't have a dial and therefore always makes the same size loop. If you are using a needle with a dial-try out different settings until you find the one best for your project. For quilt blocks, I recommend a short loop.

Any simple applique pattern-with fairly large shapes-works wonderfully for punch needle. My patterns are from the book: The Wickersham Signature Quilt from The State Museum of Pennsylvania, by Patricia Harants. The Wickersham Quilt was made in the mid-1850s in York County, Pennsylvania.

Here's the block I'm working on now. You can see the marked pattern, partially worked. Embroidery hoops come in two parts. Put the whole ring under the block. Open the screw (but don't let it come loose) and slip the top of the hoop over the block/bottom of the hoop.
Tighten the screw. You want the fabric as tight as possible in the hoop (like a drum) so if you need to, pull gently on the fabric around the hoop.
Now thread your needle. Put the needle threader along the groove all the way through the needle. (Click on the pictures to enlarge.)
Now put your thread through the end loop of the threader...
and pull the threader completely out of the needle (with the thread! :)
Gently pull the thread out of the threader.
Hold the thread as shown and...
put the threader through the hole in the needle.
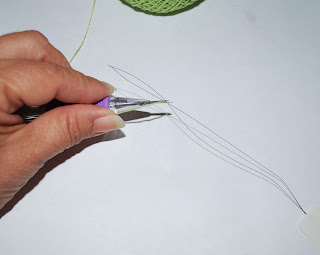
Put the thread through the end loop of the threader and pull the threader (and thread) back out the hole.
Here's the threaded needle. Leave only a small tail of thread.
Now you're ready to punch. Your needle should be held so that you do not see the groove in the needle-only the hole. (You can also punch with the needle facing side ways.) You will be punching towards your body.
Push the needle all the way in.
Lift the needle out just enough to clear the fabric and in it goes again for your next stitch. (Don't worry about the tail-we'll leave that for now.)
Keep punching-remember to have the needle go all the way in on each stitch.
Go along the outside, drawn line of your design.
The next row goes right up next to the first row...you'll slowly fill in the design. Remember to keep the thread loose coming off the spool.
The rows should be close together but don't worry if there's some fabric between rows. Look on the other side-the front side-at the loops and you'll see that its filling in nicely.
Oops! What if I take a break and when I come back some stitches have come out? Or, what if my thread was pulled too tightly off the spool and the stitches came out?

Don't worry! Here you see how a stitch has come out. Now, how do I get the thread back to being short-just a stitch from my fabric?
Just gently pull of the end of the thread...remember gently! just until the needle touches the fabric. Now punch some more.
Finished! How do I end? Hold your thumb on the needle and thread and gently pull the needle away from your work.
Now snip the thread very close. (You can snip the beginning tail now too.)
There, a leaf all punched and threads neatly trimmed.
Here's how it looks on the right side. (I don't see any funky long loops on this leaf but don't worry if you have some. I'll post a part 2 tutorial on how to finish up your punch needle that will cover that and more.)
Once you've finished part of your block and you have to move your hoop, you will have to have some of the punched area under the hoop. Its fine, it won't be permanently squooshed or anything but it will mean that the fabric won't be quite as tight in the hoop and you may have to gently pull on the fabric around the hoop now and then.
Hope that's helpful for getting started on your Punch Needle Quilt or any punch needle project.

Monday, June 27, 2011

A new punchneedle floral: Punchneedle quilt progress continues

With the summer heat and my love of air conditioning, I'm back to working on the punchneedle quilt which I haven't worked on since last summer.

My design wall now features this:
Here's a closeup so you can see that the little flowers are actually orange and the center red.
I've now completed 5 blocks and still have quite a ways to go.

I'm linking to Design Wall Monday at Patchwork Times so stop by and see the amazing work on the wall this week.

Sunday, October 17, 2010

This, That and a Recipe

It has been a fun and busy week. I finished another punch needle block and I think this one is my favorite so far...
and I started working on the border for my Drunkard's Path quilt! That has been a long time a-waiting.Last Sunday, Beth of Love, Laugh, Quilt, while on a visit to Israel, stopped off at the LQS, The Quilt Center, where I was teaching. It was so nice to actually meet a blogging friend.

DH went to the beach while I was teaching with the plan being that I would join him for the afternoon and then we'd pick up DD at the train station (Gotta love that Train to the Plane!-or in this case Plane to the Train.) The beach is just about ten minutes north of the shop but suddenly the weather completely changed...turning first cloudy and then by the time I got to the beach-drizzle. So what should we do until the train came in?? Hit the mall, what else!

Off we went to be dry and kill some time, window shopping. We thought we'd go to the movies but there were no shows until 5 pm-too late. But next door to the movies was an Arcade! Oh boy, did we have fun with that hockey game and the basketball game...two old geezers just having a jolly old time of it.

There are lots of benches in the main aisle of the mall, so Dan went off to sit and read the newspaper and I tailed along...and there right in front of his bench was a kiosk selling...

Now I have had curly hair all my life but as I got older it became much less curl and more frizz.
I am happy to say that with this wonderful gizmo my head is now a Frizz Free Zone. This is so fantastic...so easy to use and the results are fabulous. Much better and easier than using a blow dryer and a round brush. DD and I had fun giving her straight hair some curls too-after swimming in the Sea of Galilee in the morning, we had a home salon in the afternoon! :)

The next day, was Girls Day (DH was at bridge)...we went shopping for clothes for her (I got a sweater too) and then on a lark, we rented a motor boat for half an hour and had a wonderful time boating on the Sea of Galilee.

DS and DD's good friend since high school came up to help celebrate her birthday...I loved the timing of her work related trip to Istanbul-she could pop over to see us for a week before returning to NYC and was here for her birthday!

I made a huge dinner including her favorite chicken dish...absolutely the easiest chicken recipe ever-Plum Chicken. (You can just see our festive table with a bright yellow tablecloth and pink dishes!)
All you need:

1 chicken cut into eighths (quarters work too)
1/4 cup onion soup powder (1 packet Liptons onion soup)
1 can plums (16 oz./approx. 500 grams-and make sure its purple plums and not prunes)

Arrange the chicken pieces in a casserole and sprinkle on the onion soup powder.
Open the can of plums, pour the syrup over the chicken...
cut the plums in half and remove the pits (if it isn't canned pitted and halved) and arrange on the chicken pieces.
Cover and put it into a cold over. Turn the oven to 400 degrees F/200 degrees C for 1/2 hour. Lower temperature to 350 F/175 C for 1 hour. Then take off the cover -it will look like this just barely browned...
return the chicken to the oven for another 1/2 hour to finish browning and for the sauce to reduce.
Mmmm!

Sunday, September 19, 2010

Punch needle progress

We've been really busy around here...with end of summer guests, the Jewish holidays (still more to come) and some outside work on the house-so busy in fact that I haven't been blogging much. I have to apologize too for not visiting as much as usual but besides the general busyness, our cable company cancelled ESPN so DH got a subscription to MLB.com and we hook up my little netbook to the TV so he can watch sitting comfortably on the sofa. Now I used to visit blogs while he watched baseball (companions on the sofa :)...see my problem.

I haven't done much sewing either but I did manage to finish the second punch needle block-you can see how wrinkled it is from the hoop...
and a third block!
I've just started a fourth block but I'm going to run out of the green so its off to the store...I'll probably just punch needle the colors in and then get to the store!

Its cooled off a lot here (only in the 90s!) so I'm hoping to get into my sewing room this week...lots of ideas backing up!

Saturday, August 21, 2010

Punch needle project and an award

I've started a project that I've been thinking about for a while...remember my punch needle pillow? Well, I've decided to do a punch needle quilt! I think with straight line machine quilting this will be quite interesting.

This is the first block finished...well, not quite finished-its untrimmed and unblocked! What do you think of the variegated pearl cotton...I'm not sure myself but DH really likes it.Here's the second block I'm working on...these don't really take very long and are fun to do. I'm using crochet cotton and/or pearl cotton. This is the back...you can just see the pencil drawn pattern.
Here's the front.
I'm taking the patterns from this book...its the pattern book for a York County, Pennsylvania applique quilt that is believed to have been made in 1854.
I was given an award!

I'm so fortunate to have met so many lovely bloggers and two of them have given me the Versatile Bloggers award: LV from Thoughts from Meme's Corner ,an eighty year old wonder blogger and P from The Way I Sew It, a wonderful quilter! Do visit their blogs.

Here are the rules of the award: say thank you and link back...thank you ladies!, tell 7 things about myself and I'm to pass it on to 15 bloggers. I've decided to use this opportunity to introduce you to bloggers I've never linked to before.

First though 7 things about myself...hmm, well at least it doesn't say 7 interesting things.

1. My newest have-to-watch re-runs (we get a lot of old shows here!) are Stargate Atlantis.
2. I love the Dixie Chicks.
3. I can't sing for beans but that doesn't stop me from Karaoke.
4. What I love about quilting is there's always something new to try and something new to learn.
5. I can't knit and I've given up trying.
6. I'm a great procrastinator so I give myself due dates...and join challenges.
7. I'm only competitive when it comes to board games.

And now for the blog list: enjoy visiting!

1. For a hilarious look at baking, visit Cake Wrecks.
2. Visit an on-line embroidery community at the Embroidery Blog.
3. For a look at mid-century houses, furnishings, etc. visit No Pattern Required.
4. If VTT once a week isn't enough for you, visit Oodles and oodles.
6. Taryn at Repro Quilt Lover
10.Wenche at Pieces of Time
14.Andi at Patch Andi