Showing posts with label Bonnet girl quilt. Show all posts

Friday, March 16, 2012

Bonnet Girl Quilt Update

I've been machine quilting on the Bonnet Girl Quilt-after I quilted the straight lines on the embroidered bars, I marked and quilted the cable in the green floral bars. Then I had to decide what I wanted in the blue floral border. I decided I wanted a cable there too but I didn't have anything that fit-so I designed a cable. Using this cable that I had designed years ago ( you can see it used on this quilt here)...
I designed this...


 and marked it with my 100% graphite marker (which is easy to see while machine quilting and which washes out completely.)


Oops, sorry the flash is a little bright there. 
I started quilting and here's what it looks like from the back (the front had the same flash problem.)


I really like what's happening where the cables meet...this design is a keeper!


BTW, quilting cables is really fast and easy-I use my walking foot!


I think I deserve a Whoop! Whoop! (even though I haven't finished!). Hop on over to Sarah's blog and see more Whoop! Whoopiness. There's a new format there so click on "links to this post" to see all the goodies.)

Sunday, March 4, 2012

I've been quilting

I'm still not totally done with jet lag...I can't believe it is taking me this long but I'm hoping that I broke it completely today. Its not just the unusual sleep patterns-I just don't seem to have the same energy level. I have however managed to do some quilting.


I had rolled the Double Wedding Ring quilt in the frame before we left and I'm now here...


and I've already completed half of this roll.


I've also been doing some machine quilting...I had basted the embroidered Bonnet Girl quilt before leaving but hadn't started the quilting at all. I've done the straight lines on the embroidered bars and I'm thinking I'll put a cable in the narrow green floral bars.


 You can see I'm just sewing right over the embroidery...looks fine to me! :) and easy too!

Sunday, October 3, 2010

Bonnet Girl Quilt-Free Pattern Instructions

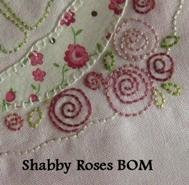
You can download the embroidery pattern for the Bonnet Girl here.

Fabric requirements:

For two background fabrics or the embroidery blocks: Fabric 1: 1 yard

Fabric 2: 1 yard

For a single background fabric for the embroidery blocks: 1 3/4 yards

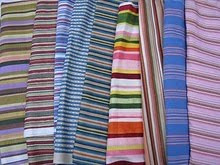
For the bar fabric (I used a Robyn Pandolph fabric): ½ yard

For the border fabric (again I used a Robyn Pandolph): 2 yards

Cutting and Sewing Instructions for Bonnet Girl Quilt

For the embroidery blocks:

From background 1: Cut 2 strips 15” x 42”. Cut 6 squares 13” x 15”.

From background 2: Cut 2 strips 15” x 42”. Cut 6 squares 13” x 15”.

(If using one background fabric, cut 4 strips 15” x 42”. Cut 12 squares 13” x 15”.)

Embroider the blocks, Press. Trim squares to 12 ½” x 14 ½”.

Arrange block to your liking in 3 vertical rows of 4 blocks each.

Sew vertical rows.

Bars:

Cut 3 strips 3” x 42. Cut one strip in half for 2 short strips 3” x 21”.

Sew half strip to full strip to create 2 long strips 3” x 63”. Cut each to 3” x 56 ½”.

Tip: We all cut and sew just a little bit differently. For exactly fitting bars and borders, measure your sewn rows of embroidered blocks. Take the mean or average length of all of the rows and cut your bars to that length. Example:

Row 1: 56 ½:, Row 2: 56” Row 3: 56 ¼” . The mean value of the three rows is 56 ¼”. Cut all the bars 3” x 56 ¼” rather than the theoretical 56 ½”. It will be easy to ease in that extra ¼” on Row 1 (56 ½”) and to “stretch” Row 2 (56”) when sewing the bars to the embroidery blocks rows. All three rows will now be the exact same length. (Clear as mud, I know but try it.)

Lay out your sewn embroidered block rows, check you like the arrangement and lay the bars between the rows. Sew bars to vertical rows of embroidered blocks .

Border

Cut 2 strips 10 ½” x 42”. Cut top and bottom borders to 10 ½” x 41 ½”. (See tip).

Sew top and bottom border the embroidered rows/bars.

Cut 4 strips 10 ½” x 42” Sew two strips together to make long strip 10 ½” x 84”. Repeat.

Cut side borders 10 ½” x 76 ½”. (See tip). Sew side borders.

Congratulations: Your embroidered Bonnet Girl quilt top (61” x 76”) is finished. This size is good on a twin bed or as a lap quilt.

Thursday, September 30, 2010

Bonnet Girl Quilt Top Finished

Last week I showed my vintage Bonnet Girl quilt/summer coverlet (I think of it as my Sugar Sack quilt :)...last summer I shared the tracing of the embroidery design and some blocks that I embroidered. Well, I finished the blocks over the winter and here's my interpretation of that vintage quilt.

I stayed with the bar lay out but that's about it. I used Robyn Pandolph fabrics for the bars and wide border. I embroidered with many different color flosses and I added a lot more detail to the dresses. I loved doing it-it was dressing little dolls.
Bonnet Girls have lots of different names...these could also easily be called Umbrella Girls...here are some close-ups.
Check out the pantaloons above...I love doing French knots!
I couldn't resist filling two dresses with lazy daisy flowers.
I think this is one of my favorites...like a delicate dotted Swiss.
I used two different background fabrics for the blocks...they're Kona cotton but I don't remember the exact shades. One is beige and the other pink. Its very subtle.
If you too would like to make a Bonnet Girl (or Umbrella Girl!) quilt, you can download the embroidery pattern here.

I think I'll post cutting and sewing instructions for the quilt and a tutorial on outline embroidery this week-end.

I'm linking to Finished for Friday at Lit and Laundry and Sew and Tell at Amylouwho. Be sure to stop by both and see the wonderful things made and sewn this past week.