Showing posts with label free pattern bonnet girl. Show all posts

Sunday, October 3, 2010

Bonnet Girl Quilt-Free Pattern Instructions

You can download the embroidery pattern for the Bonnet Girl here.

Fabric requirements:

For two background fabrics or the embroidery blocks: Fabric 1: 1 yard

Fabric 2: 1 yard

For a single background fabric for the embroidery blocks: 1 3/4 yards

For the bar fabric (I used a Robyn Pandolph fabric): ½ yard

For the border fabric (again I used a Robyn Pandolph): 2 yards

Cutting and Sewing Instructions for Bonnet Girl Quilt

For the embroidery blocks:

From background 1: Cut 2 strips 15” x 42”. Cut 6 squares 13” x 15”.

From background 2: Cut 2 strips 15” x 42”. Cut 6 squares 13” x 15”.

(If using one background fabric, cut 4 strips 15” x 42”. Cut 12 squares 13” x 15”.)

Embroider the blocks, Press. Trim squares to 12 ½” x 14 ½”.

Arrange block to your liking in 3 vertical rows of 4 blocks each.

Sew vertical rows.

Bars:

Cut 3 strips 3” x 42. Cut one strip in half for 2 short strips 3” x 21”.

Sew half strip to full strip to create 2 long strips 3” x 63”. Cut each to 3” x 56 ½”.

Tip: We all cut and sew just a little bit differently. For exactly fitting bars and borders, measure your sewn rows of embroidered blocks. Take the mean or average length of all of the rows and cut your bars to that length. Example:

Row 1: 56 ½:, Row 2: 56” Row 3: 56 ¼” . The mean value of the three rows is 56 ¼”. Cut all the bars 3” x 56 ¼” rather than the theoretical 56 ½”. It will be easy to ease in that extra ¼” on Row 1 (56 ½”) and to “stretch” Row 2 (56”) when sewing the bars to the embroidery blocks rows. All three rows will now be the exact same length. (Clear as mud, I know but try it.)

Lay out your sewn embroidered block rows, check you like the arrangement and lay the bars between the rows. Sew bars to vertical rows of embroidered blocks .

Border

Cut 2 strips 10 ½” x 42”. Cut top and bottom borders to 10 ½” x 41 ½”. (See tip).

Sew top and bottom border the embroidered rows/bars.

Cut 4 strips 10 ½” x 42” Sew two strips together to make long strip 10 ½” x 84”. Repeat.

Cut side borders 10 ½” x 76 ½”. (See tip). Sew side borders.

Congratulations: Your embroidered Bonnet Girl quilt top (61” x 76”) is finished. This size is good on a twin bed or as a lap quilt.

Thursday, September 30, 2010

Bonnet Girl Quilt Top Finished

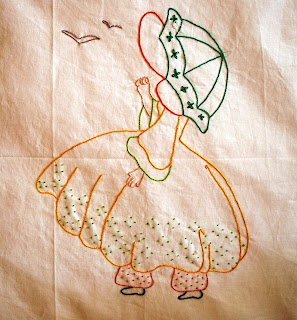
Last week I showed my vintage Bonnet Girl quilt/summer coverlet (I think of it as my Sugar Sack quilt :)...last summer I shared the tracing of the embroidery design and some blocks that I embroidered. Well, I finished the blocks over the winter and here's my interpretation of that vintage quilt.

I stayed with the bar lay out but that's about it. I used Robyn Pandolph fabrics for the bars and wide border. I embroidered with many different color flosses and I added a lot more detail to the dresses. I loved doing it-it was dressing little dolls.
Bonnet Girls have lots of different names...these could also easily be called Umbrella Girls...here are some close-ups.
Check out the pantaloons above...I love doing French knots!
I couldn't resist filling two dresses with lazy daisy flowers.
I think this is one of my favorites...like a delicate dotted Swiss.
I used two different background fabrics for the blocks...they're Kona cotton but I don't remember the exact shades. One is beige and the other pink. Its very subtle.
If you too would like to make a Bonnet Girl (or Umbrella Girl!) quilt, you can download the embroidery pattern here.

I think I'll post cutting and sewing instructions for the quilt and a tutorial on outline embroidery this week-end.

I'm linking to Finished for Friday at Lit and Laundry and Sew and Tell at Amylouwho. Be sure to stop by both and see the wonderful things made and sewn this past week.

Sunday, September 27, 2009

More Bonnet Girl Embroidered Blocks

I've been working on more Bonnet Girl blocks...these are just so much fun! I've made this one delicately colorful! I really like how the French knots look going further up the skirt-it reminds me of dotted Swiss fabric from when I was a girl! (I had a red dress with white dots.) I couldn't resist-I had to google dotted Swiss fabric-it was first made in Switzerland! :) in 1756 and is usually a light/pastel cotton fabric (batiste) and the dots are either woven or flocked on. You can see some pictures of dotted Swiss fabric here. (I remember my dress was flocked. Remember when flocking was really popular?-my mother had flocked wall paper in our hallway.)

This girl's dress is an all over floral-maybe nasturiums and her bloomers are a very delicate gray blue "lace". She is all ready to go for a walk in the park to look at the changing leaves-dressed in her Fall finery!

This is really fun, now I don't just get to dress up my "dolls", I can make up stories about them too!
Remember, if you'd like to make some Bonnet Girl blocks-the free pattern is on my sideboard.

Tuesday, September 22, 2009

Embroidered Bonnet Girl Free Pattern

On Tuesday, our computer went kaput! Fortunately, it gave us some warning-it kept restarting itself-so our resident IT Guy was able to save all our files before it died completely. His diagnosis: the motherboard was shot! We took it in and the shop agreed-turned out they were able to get us a new motherboard and since it was 1/3 the price of a new tower, we went with that option. DS spent yesterday getting our files reinstalled...actually it is still on-going-I'll want to do something and he has to come and install whatever it is he forgot to do (like hook-up the scanner!)


Remember I said I'd show the blocks I've started embroidering and upload the pattern that I traced from my vintage Embroidered Bonnet Girl Quilt...

Here are the two blocks that I've completed...I'm really having a good time "dressing" the girls! They're all done with outline stitch, French knots and Lazy Daisy stitches.


I've used two different background fabrics...a beige and a pale pink. You can see I've added some extra decoration to the girls' dresses , their umbrellas, and even their bloomers! This is so much fun!

You can download the pattern here. Please let me know if you do embroider one or more-a whole quilt's worth like I'm going to do!-it will be so much fun to see and share our "fashion" ideas.

Here's a pix from the original vintage quilt-just so you can compare and see the wonderful possibilities in dressing these girls...I'm telling you-this is as much fun as playing with dolls!