Months ago I said I would post an outline stitch embroidery tutorial...well, finally here it is. I can't believe how long it took me to get someone to take the photos-fortunately DS was up for New Year's week-end and he took the photos...but it was at night so please excuse the orangy color!
I'm starting with separating the floss strands and threading the needle so if you're good with that just skip on down.
I use six strand DMC floss (here its #310 black) and usually use two strands. Cut off an arms length of the floss and spread the floss out between your fingers.
 Now - keeping the floss pressed between your fingers - pull on only one strand. Pull it out completely in one draw.
 Since I'm using two strands I just pull out a second one the same way. Don't try to pull two at a time-they will only knot up and make a mess.
 I next align the two strands together and hold them in my left hand (my non-dominant hand) pinched between my fingers. I hold the needle in my right hand and with the eye of needle visible to my eye- I just aim at the floss.

This works all the time...by pinching the floss or thread between my fingers the floss (or thread) can't wiggle away from the needle the way it can when you take the thread to the needle. This works as well for six strands of floss as two and for any size needle-including little size 10 or 12 quilting needles.
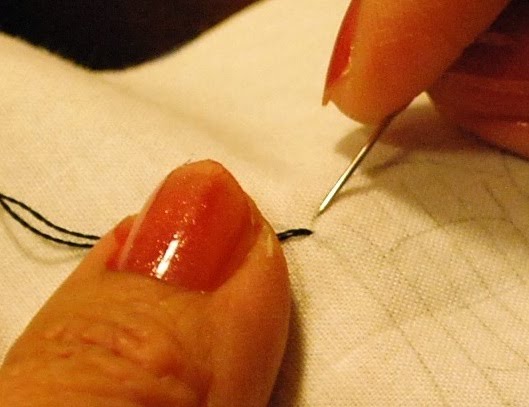
Now that my needle is threaded, I tie a knot at the end of the thread (yes, I use a knot!). And bring the needle up from the back of the marked fabric on the line I want to start on.

Pull the needle through...holding the thread up above the line, put the needle back in on the line.

Bring the needle out on the line back towards the floss exiting the fabric...

Take small stitches...always with the thread held above the line and the needle always going in and coming out on the line. Instruction books always say to have the needle come out about half way back towards the thread but I usually work with smaller stitches and the needle comes out almost at the thread...really just a tiny bit in front.
That's the first stitch...

and the second....

and the third! You just keep going...its that simple!

The outline stitch is faster to sew than back stitch...it also gives a more raised appearance than back stitch.
Hope this has been helpful! I really love this style of embroidery and as you know, use it a lot.
You can download the free hand embroidery pattern Umbrella Girls/Bonnet Girls
here and directions to complete a twin size quilt
here. The Girls are all done in outline stitch although I did use some Lazy Daisy flowers and French Knots on some of the girls' dresses-just for extra decoration.
 Here's a close up of one of the baskets and the diagonal curvy lines I quilted through the embroideries.
 Here you can see the wandering vine with leaves I quilted in the large white areas and
 the small vine with leaves and larger flowers I machine quilted in the smaller isolated white areas
 The center embroidered block shows how the curvy lines meet in the middle.
 Here's the quilt-folded on a chair and showing the white binding outside the black border.
 I'm linking up with Sarah's Can I get a Whoop-Whoop today. Hop on over and see the wonderful things on view.